Read with Claude
 Read with ChatGPT
This blog will cover how to create tables and a small introduction to CRUD APIs for the project Insight. Insight allows users to save links in the database. With a call to the GPT API, the frontend also sends the summary of the content along with the link.
We will make use of Xano to create our database table and API. Xano is a no-code backend that enables non-technical (and technical) individuals to integrate the backend into their applications with ease. We are going to see we can get CRUD APIs from Xano out-of-the-box and further create 2 APIs of our own:
- /add_links: To add a new link to the “links” table. We will add a conditional check to our API (not available in the default Create API), which will throw an error when the link is not sent.
- /read_links: To get all links from the table in descending sort order.
We will also talk about how to make a basic validation to add records to the tables using conditional statements.
So, what is CRUD?
Let’s start with the basics and the age-old question of what is CRUD. CRUD stands for Create, Read, Update and Delete. These are the primary functions that are used for data manipulation.
- Basically with Create, you can add data to your database.
- With Read, you can get the list of data or a single entry.
- With Update, you can edit the data.
- Finally, with Delete, you can remove the data from your database.
CRUD operations are at the core of database connections and our main source of connection will be through APIs.
API, Application Programming Interface, is responsible for handling and interfacing your application with the application you’re requesting service from (in this case, the database).
Getting Started with Xano
If you don’t have a Xano account, take the help of the tutorial to create your Xano account here: Jumpstart tutorial. Once you have your Xano account ready, log in and select your instance.
Xano has a number of flexible options for field types and handling of data. We are going to be creating a table in the instance. For creating a table:
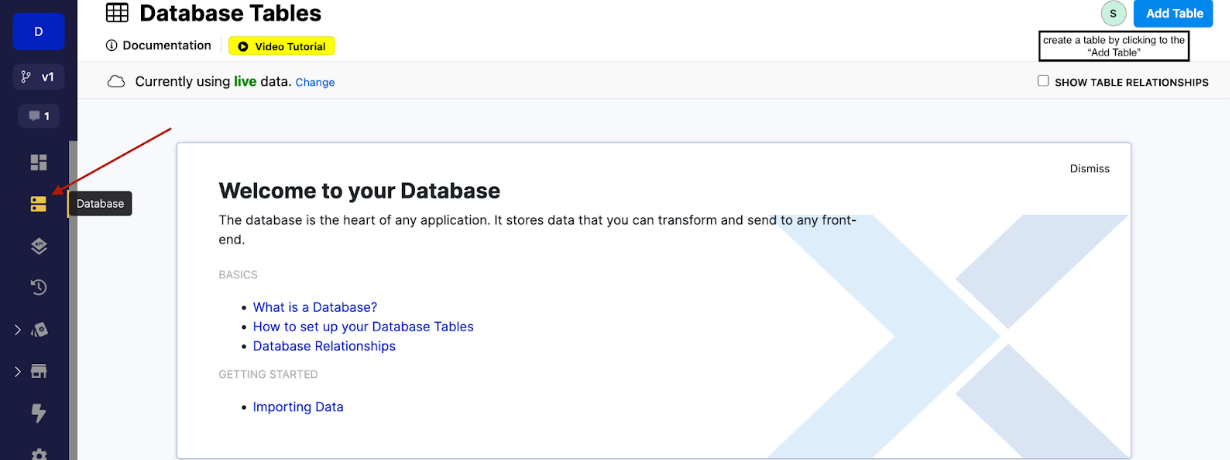
- You can find “Database” in the side navbar.
- Create a table using “Add Table” on the top right corner.
3. In the left popup for “Add Table”:
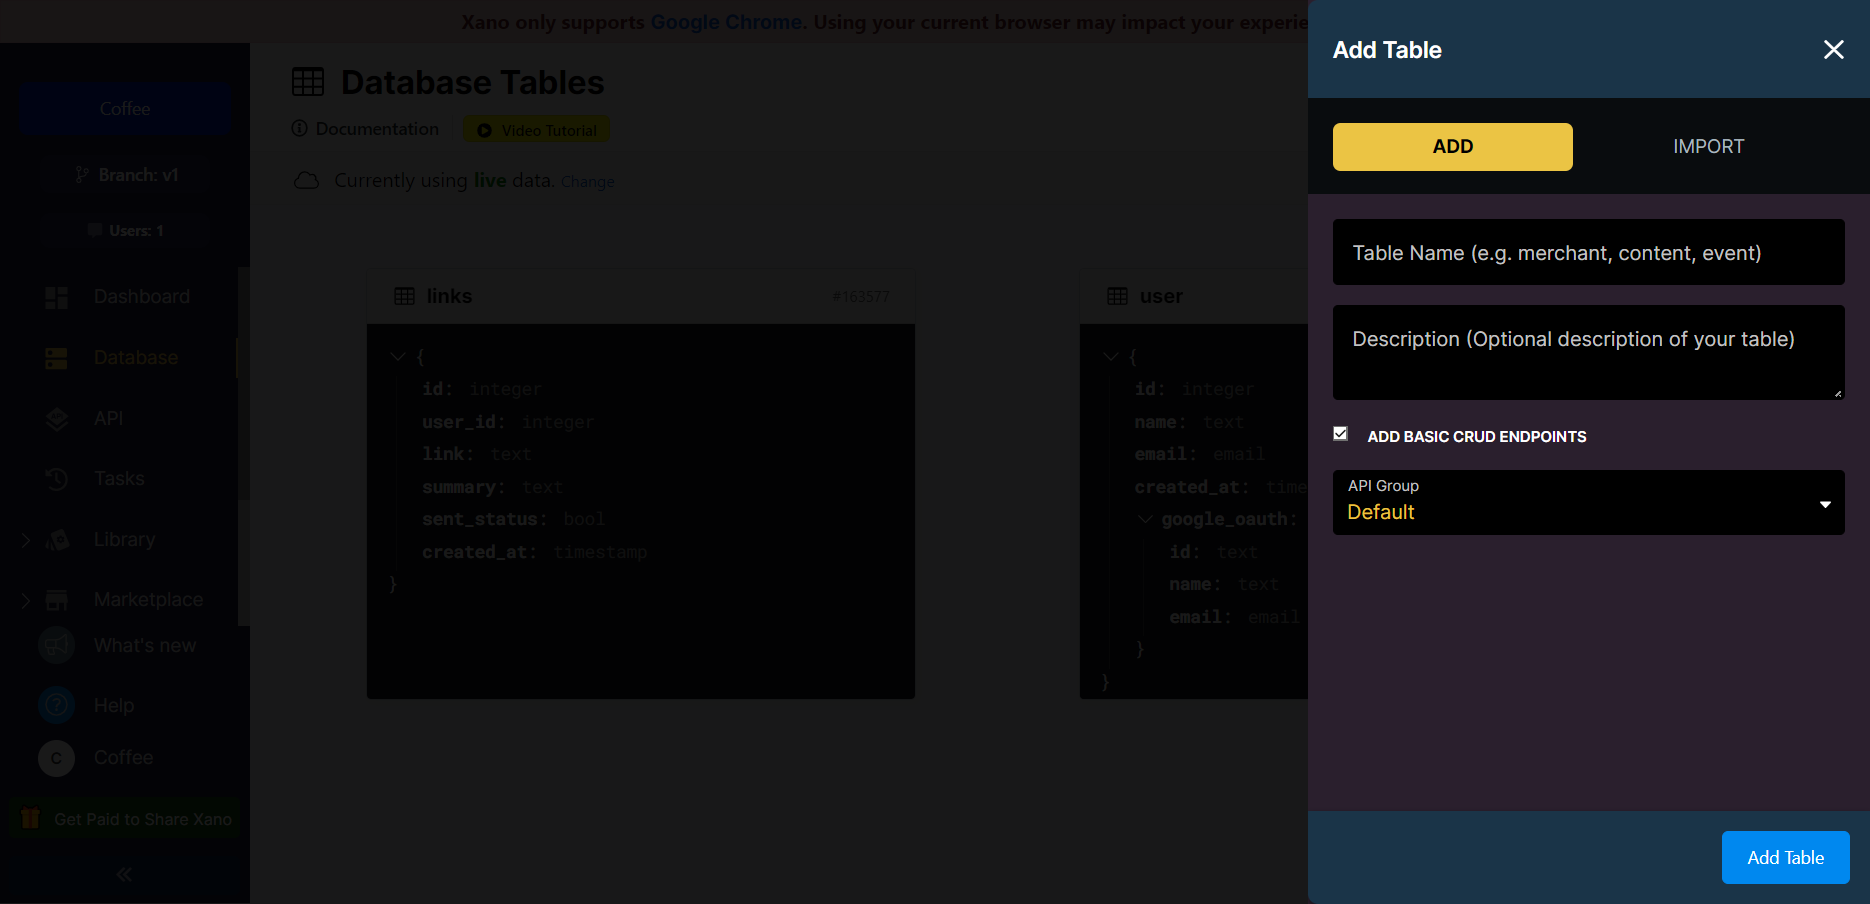
3.1. Enter the table name: “links”.
3.2. Enter a description for the table (optional)
3.3. Check “ADD BASIC CRUD ENDPOINTS”. This will pre-create the basic CRUD operations that can be performed by the API. I will elaborate further below.
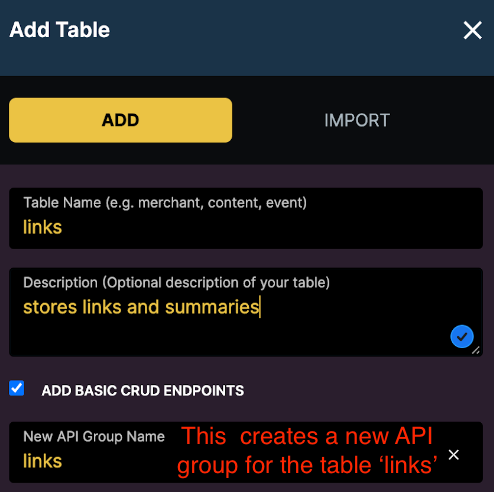
3.4. Select “New API Group Name” for the API group name and enter a value (If not, the table’s APIs will be saved under an API group called Default).
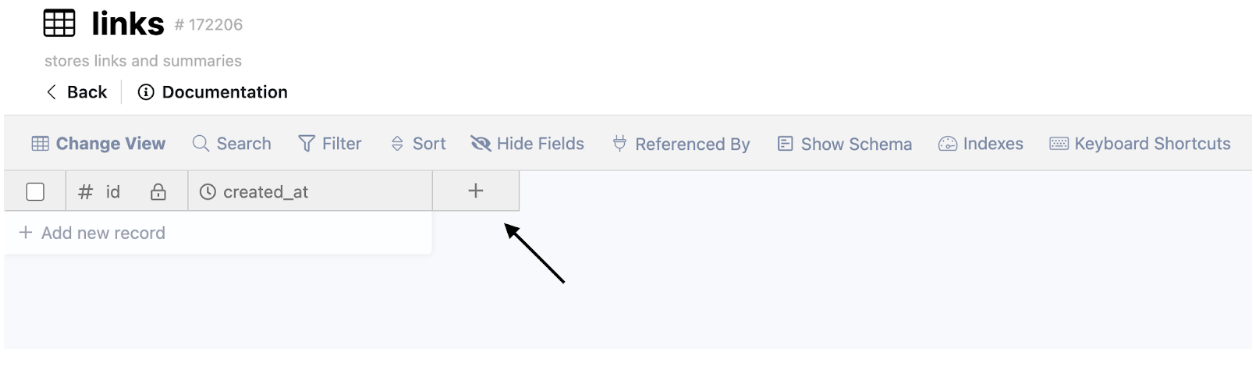
The “links” table will be created with two default columns:
- id
- created_at
We can add new fields by clicking on the “+” icon in the last column of the table.
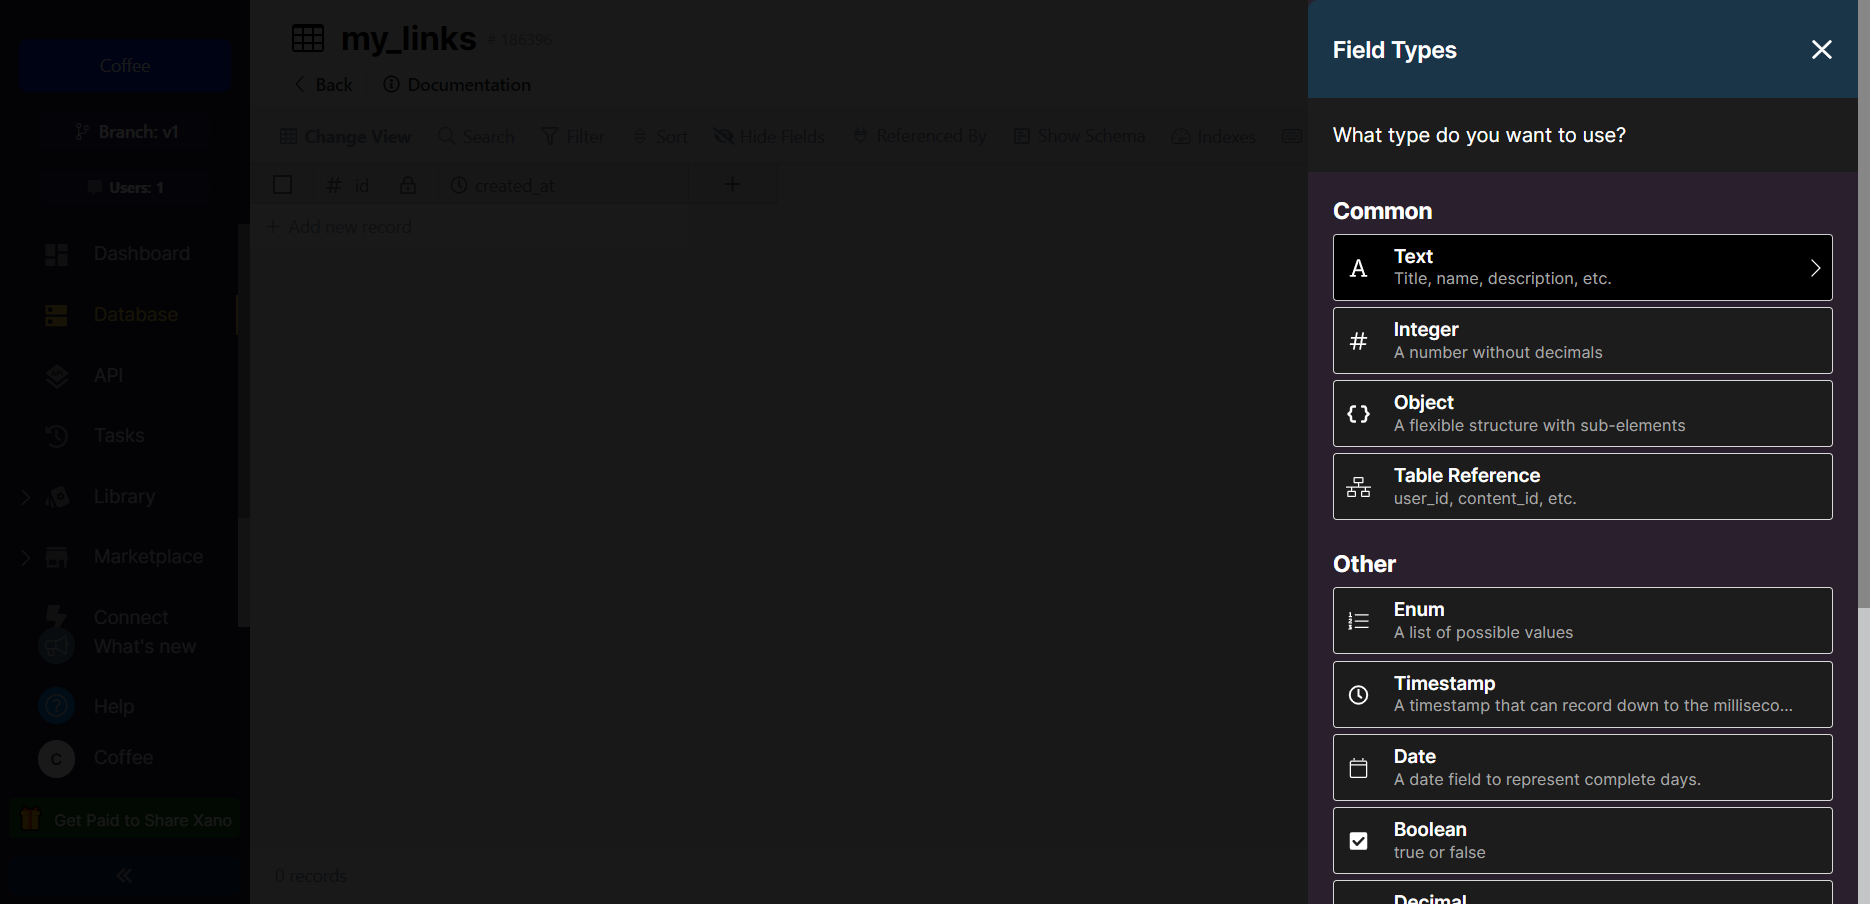
Xano provides a number of field types, considering the kind of data you want to save. For this tutorial we are going to be using the “Text” field type.
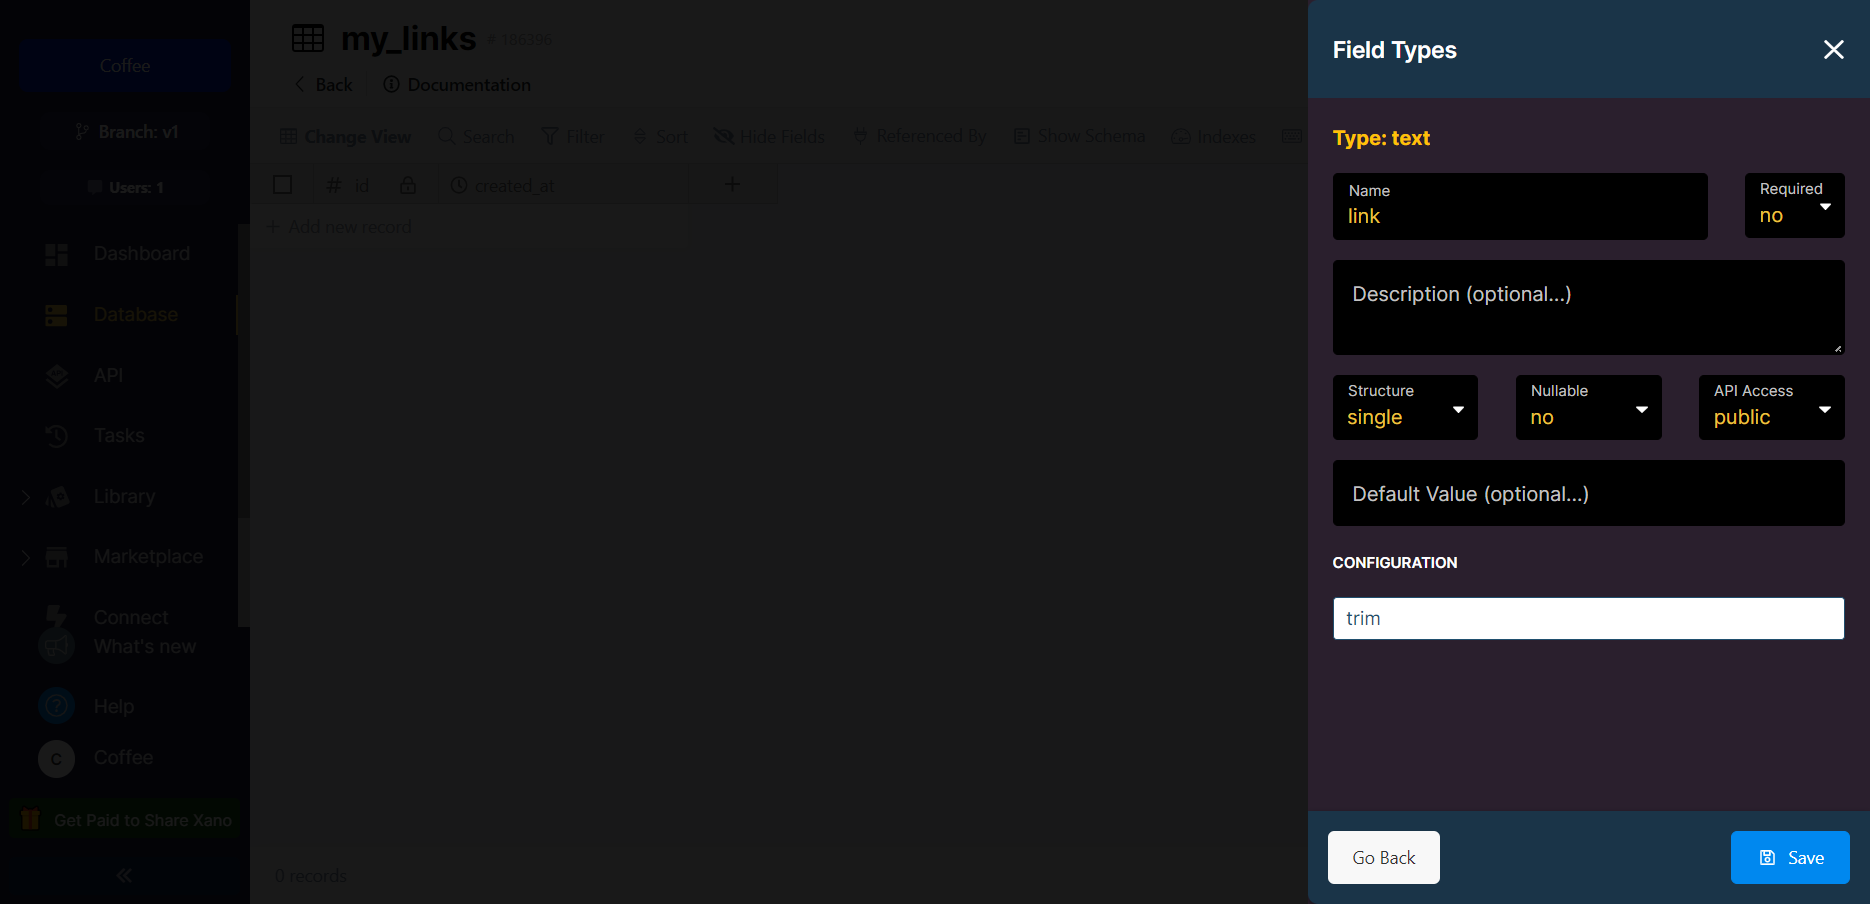
Here, I will be creating two Text fields,
- link
- summary
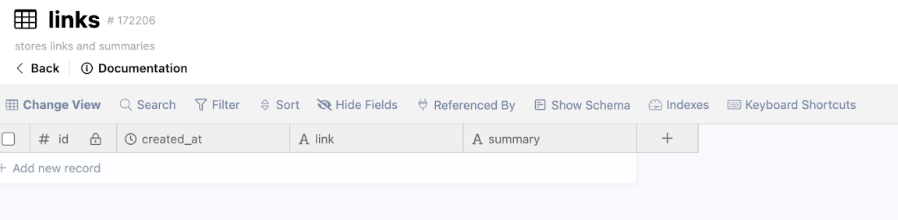
Now your table is ready to store new records. You can either manually enter the records or feed them from your front end with the help of APIs.
Exploring APIs from Xano
You can find your API group in the API tab. Since we created a group point called links and enabled basic CRUD APIs, we will be seeing a separate group API with the same name.
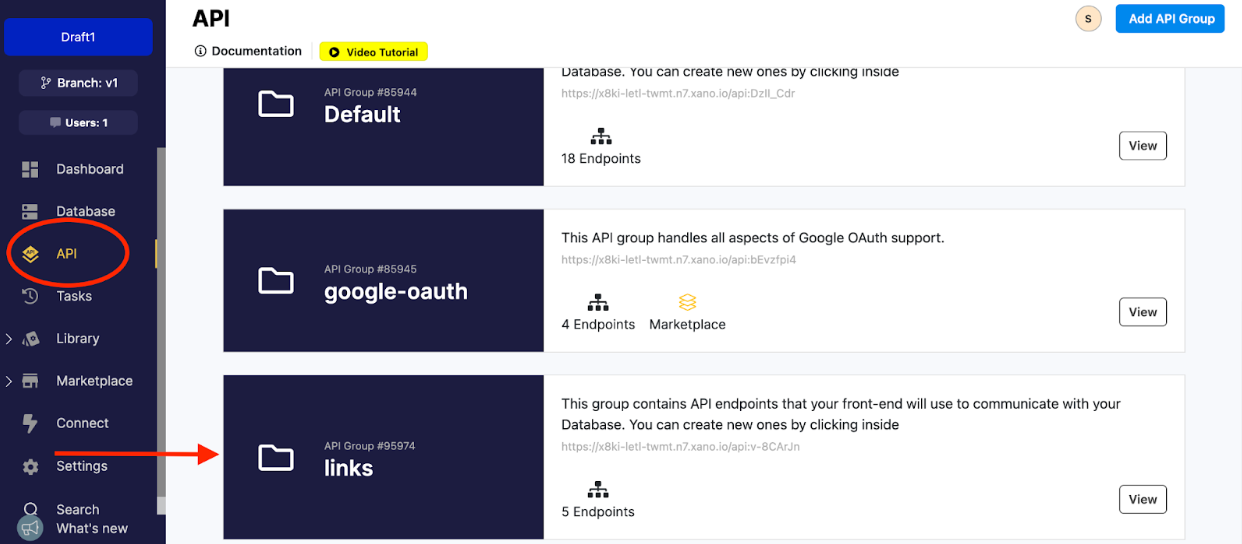
Once you open the group endpoint, you might typically see this:
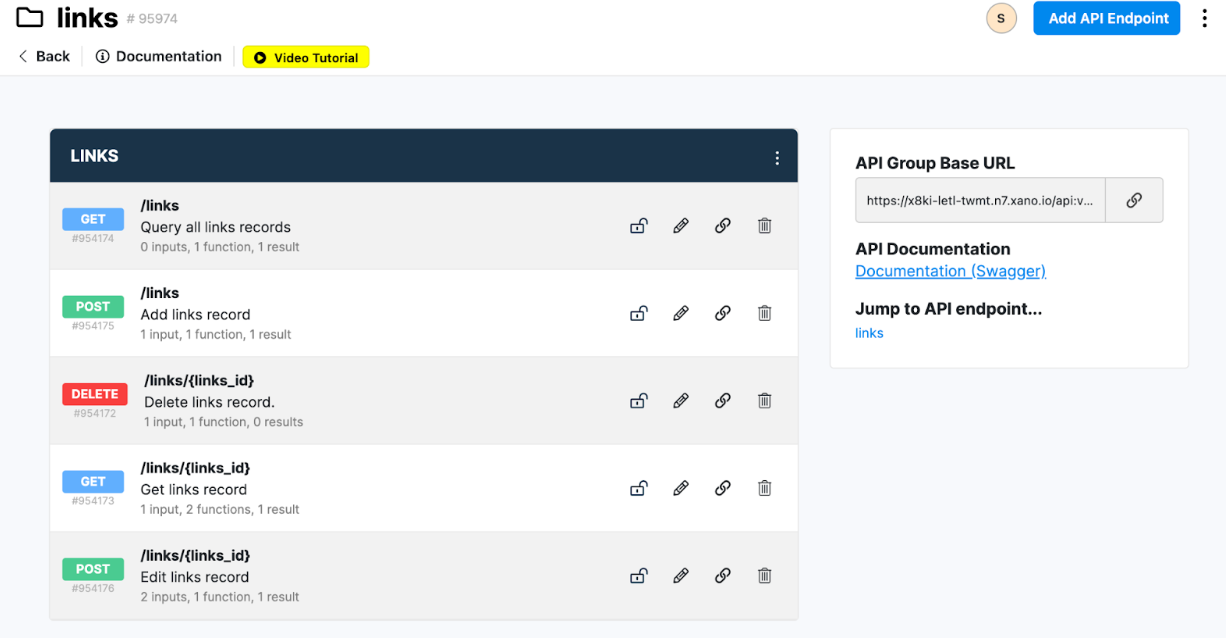
While creating a new API endpoint, you will come across several methods that the API is expected to do. With Xano, there are 3 main method types that are used:
- POST: Used to submit the request to the specified source.
- GET: Used to request data from the specified source.
- DELETE: Used to submit a request to remove data.
Here, the source means the table we are working with. Again for reference, let me point out what CRUD stands for: CRUD: Create, Read, Update, Delete
Now a brief on the above API endpoints:
- POST — /links: “Create” operation of CRUD. Writes or Posts data into the “links” table.
- GET — /links: “Read” operation of CRUD. Reads or Gets data from the “links” table. This is often used to Query
- DELETE — /links/{links_id}: “Delete” operation of CRUD. Deletes a specific record identified by the “links_id” field of the “links” table.
- GET (SINGLE) — /links/{links_id}: “Read” single operation of CRUD. Reads data of a single record from the table based on “links_id”.
- POST — /links/{links_id}: “Update” operation of CRUD. Updates or edits an existing record, which is identified by “links_id”.
Note: You might notice “API Documentation” with a Swagger link attached under it. Swagger is nothing but dynamic documentation that would have your APIs and expected responses along with their interpretations.
Creating our own APIs
Although there are ready-to-use API endpoints, we will be creating our own APIs. I am choosing to create new APIs to illustrate the process of creation, instead of editing the existing APIs, which is also a feasible solution.
/add_links API
First, let us make an API endpoint that can post or add records to the table (“/add_links”). “Add API Endpoint” at the top-right will lead you to this:
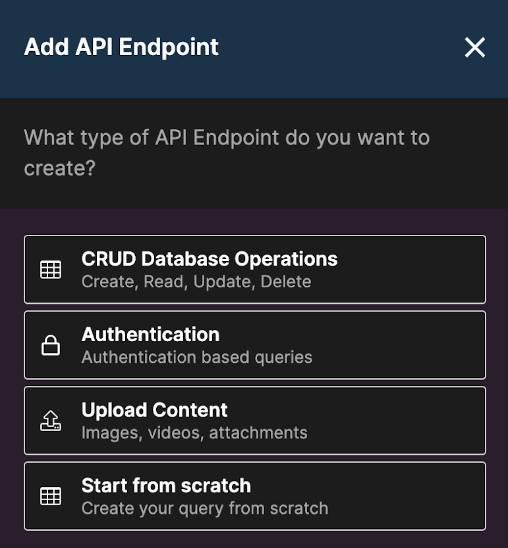
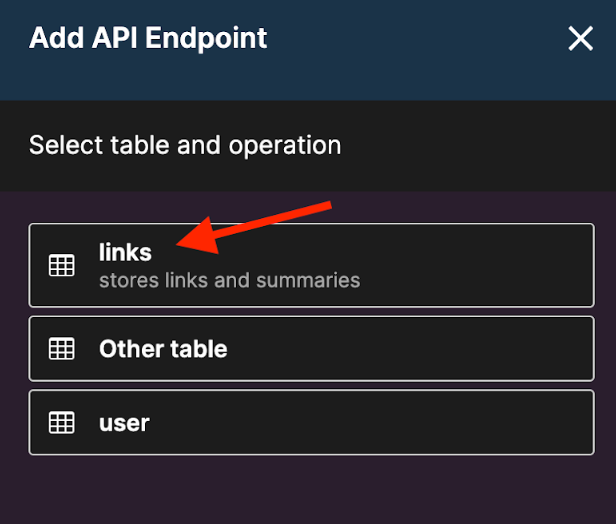
Once you select CRUD API, the following will be the steps to build an API:
Since we will be getting the data from the front end and posting it in the database, the POST operation would be the right choice.
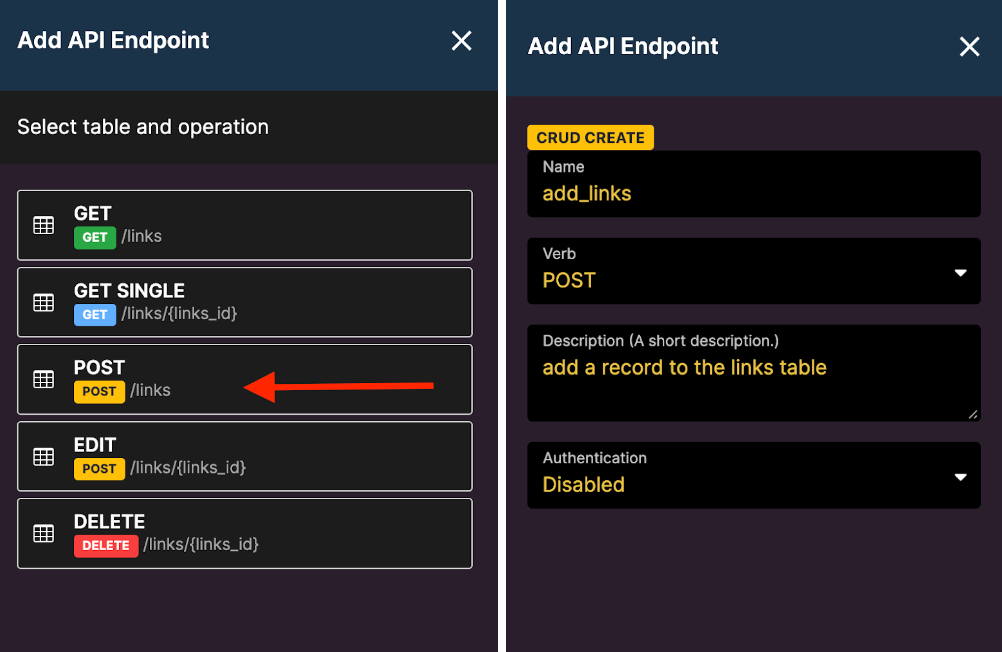
A point to note here is we have disabled the authentication provided by Xano as I have not set up a user table for auth yet. But in the future, I plan to make links user-specific, so then I can make use of the Authentication feature (for a future article :)).
Here is a quick rundown on the API endpoint page:
- “Copy Endpoint URL” gives me the Xano URL for the particular endpoint
- “Request History” helps me view all the calls to the API and debug issues if any.
- “Run & Debug” allows me to run the API with dummy data and view responses.
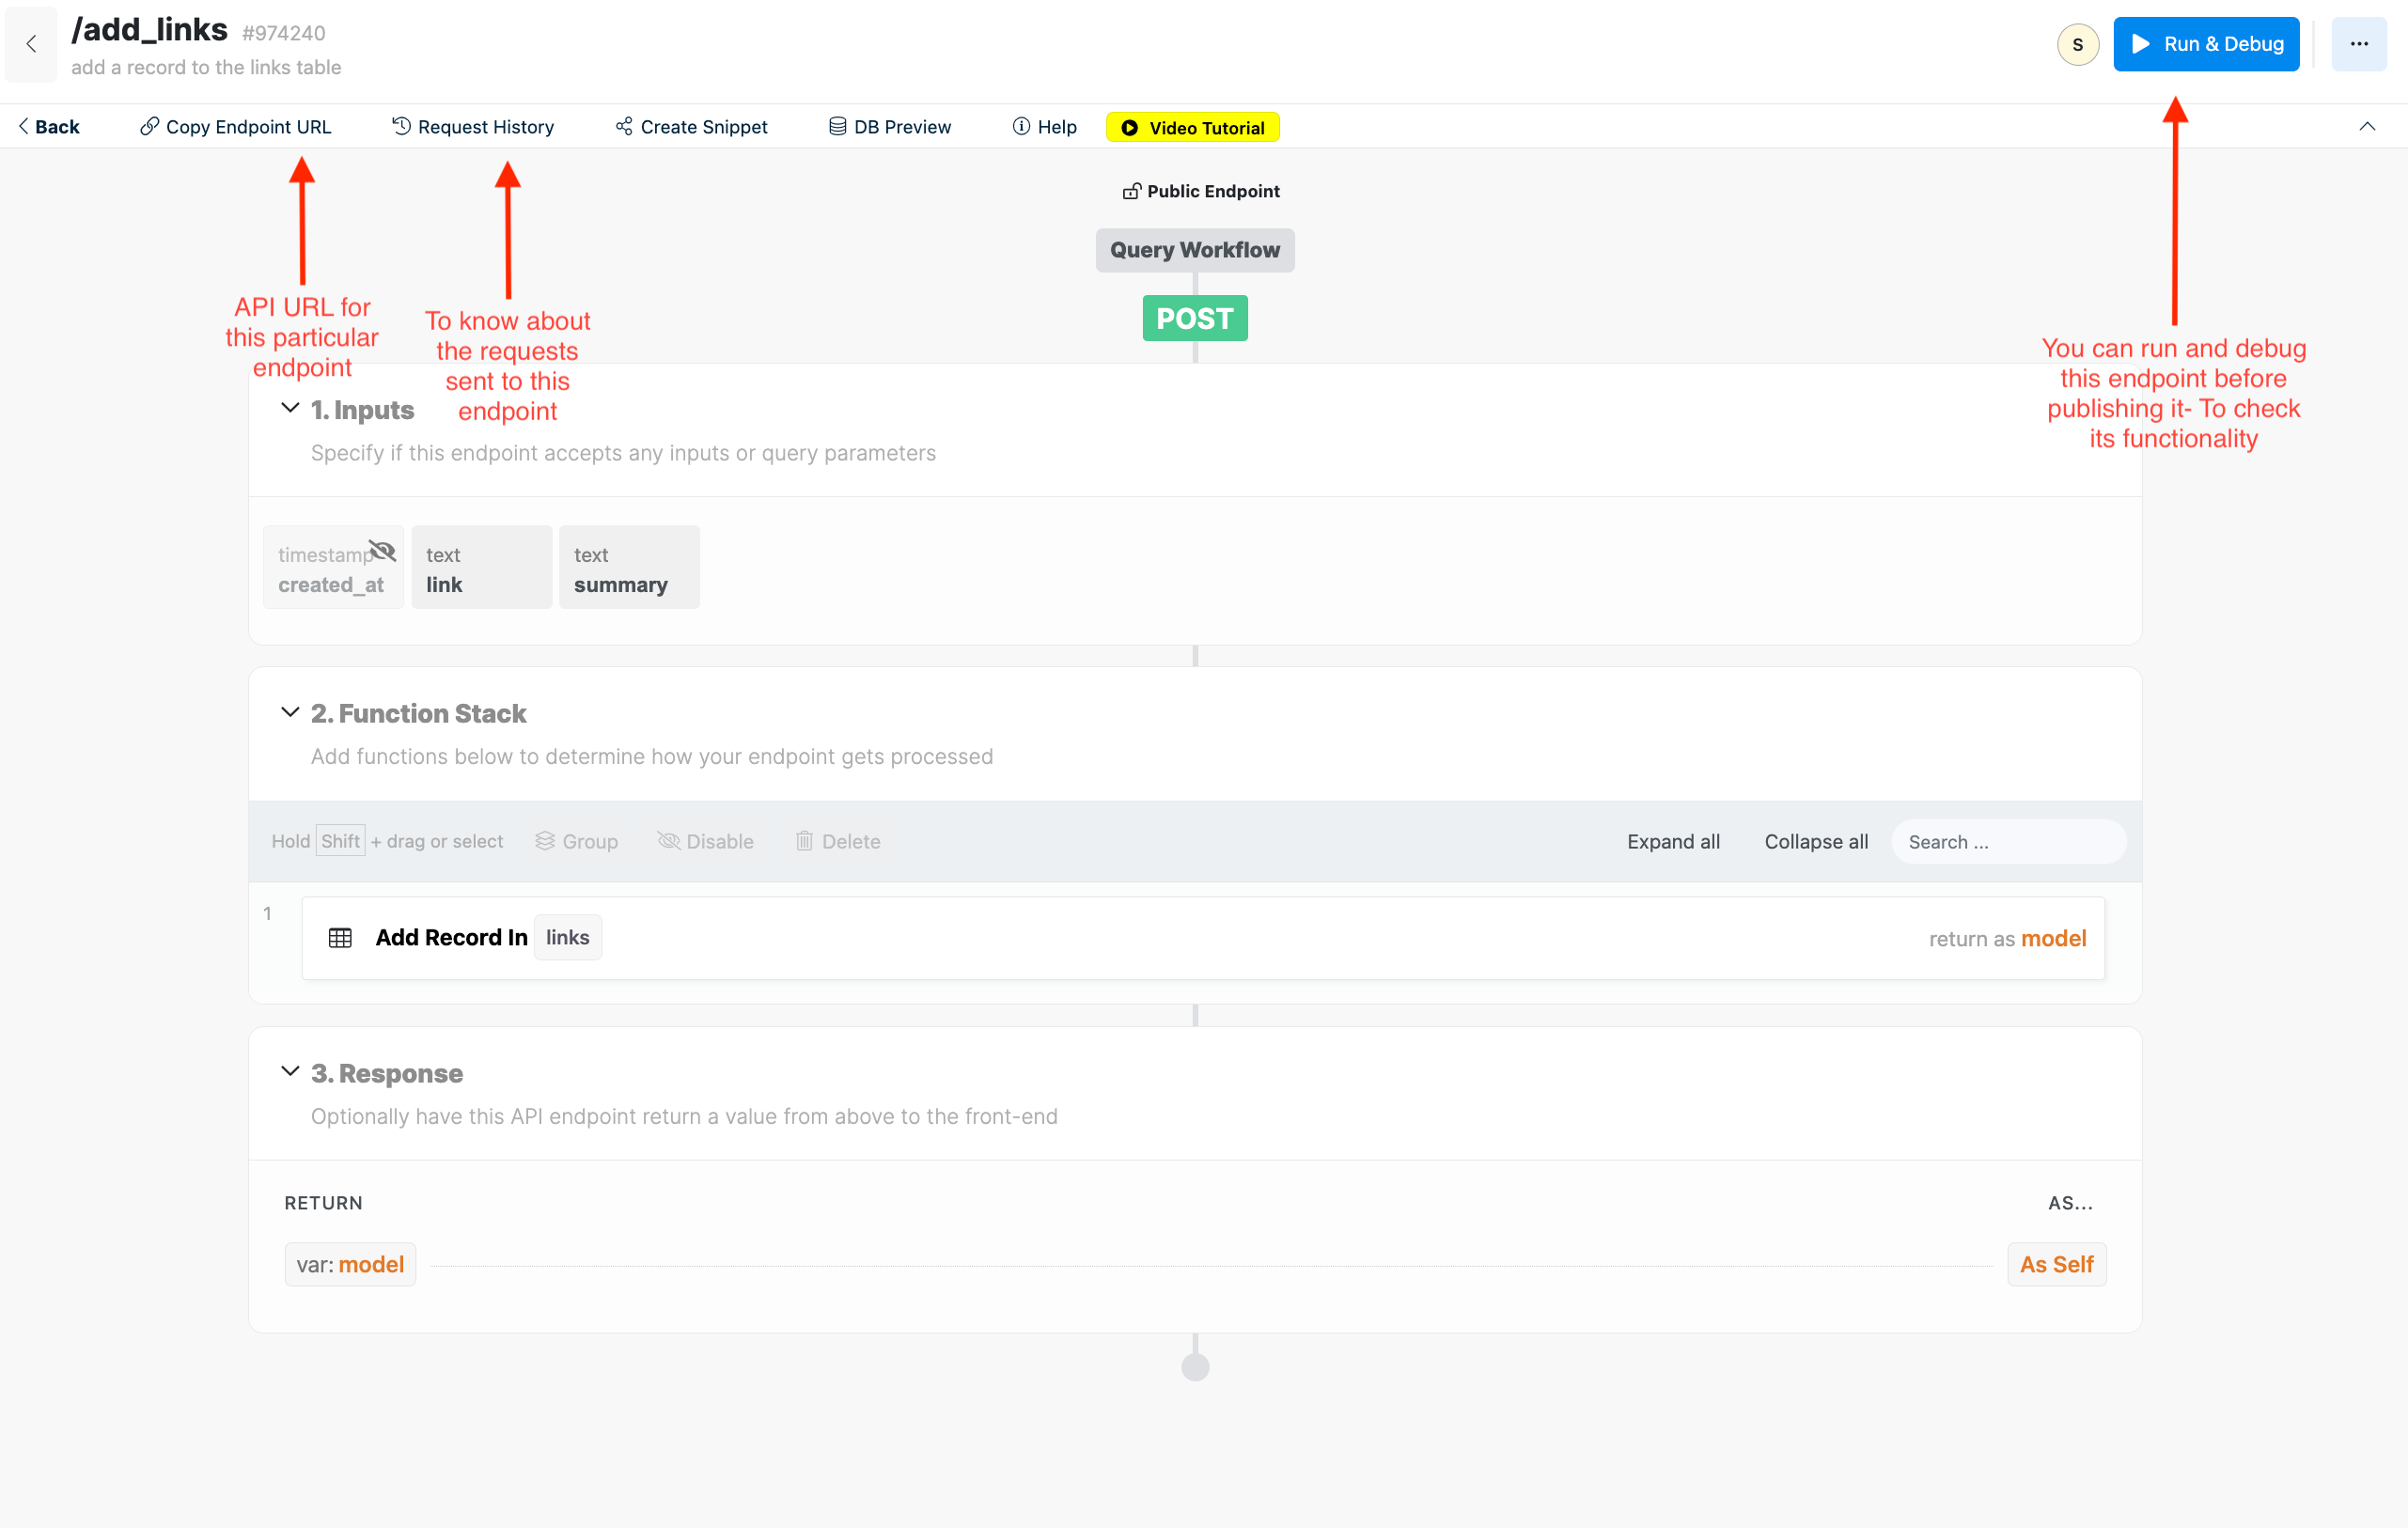
By default, you will have the function of adding records to your table. To try it out, click Run & Debug.
Here, “link” and “summary” are the Text fields of our database. Since these fields are included in the “Inputs” section of the API endpoint, you can enter values to test and Run the API.
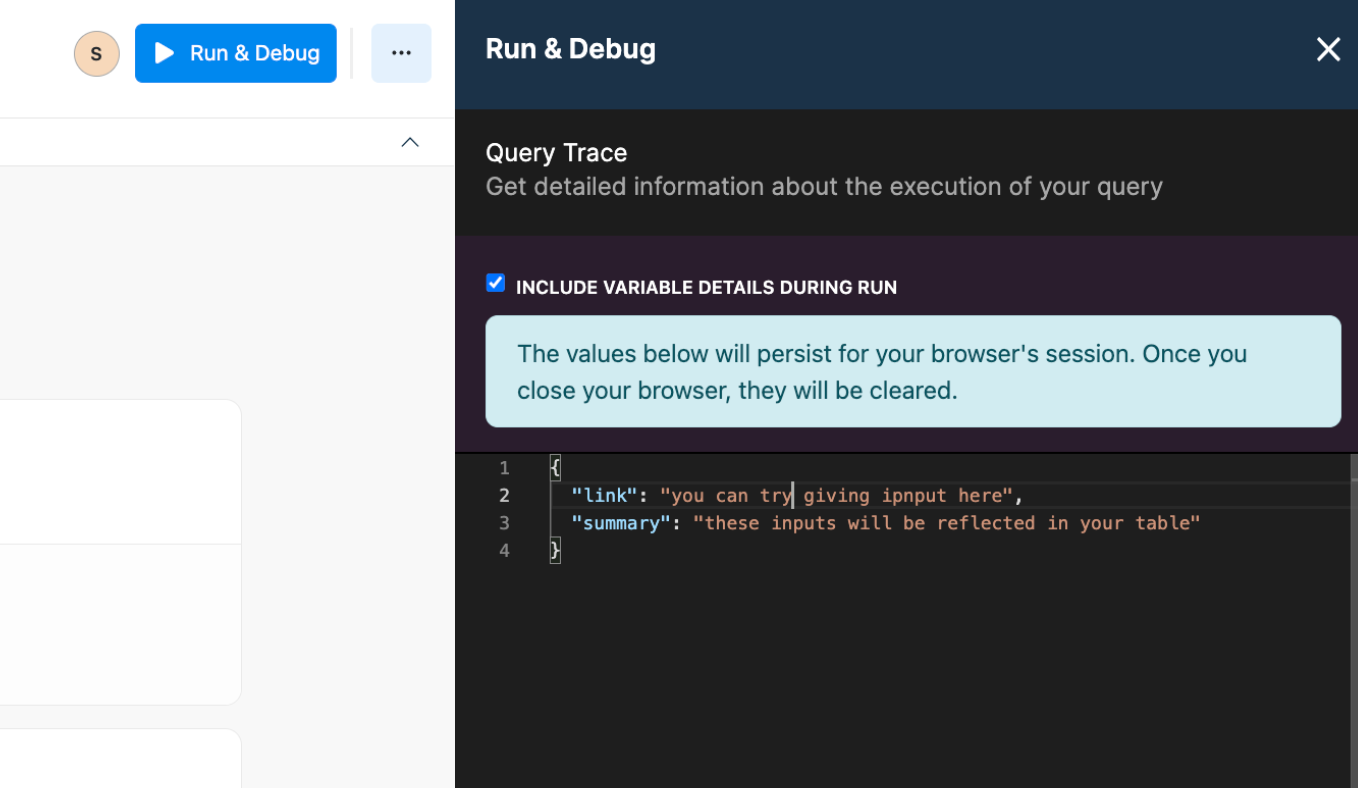
Once you hit “Run”, you will be able to see the response of the API:
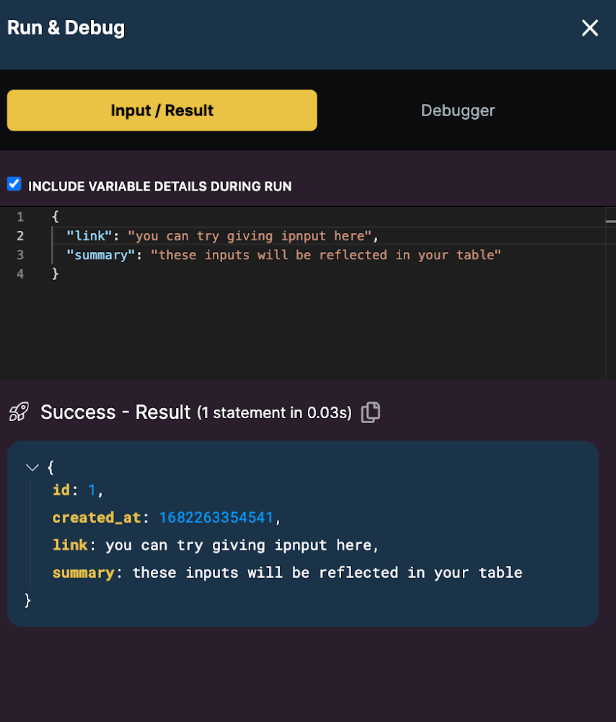
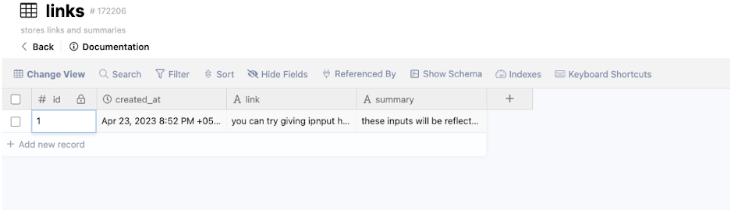
You can now find these as your new record in your table.
Now, let’s add a condition. Add the records to the table only if the “link” field is not empty i.e., the user must provide some value in the “link” field and not leave it null. Else throw an error message.
Now, let’s try playing around by adding a conditional statement for adding the records. Delete the existing functions so that your function stack is empty.
Adding an IF statement:
Now, in the functional stack, create conditional statements for the above case. To find a conditional statement:

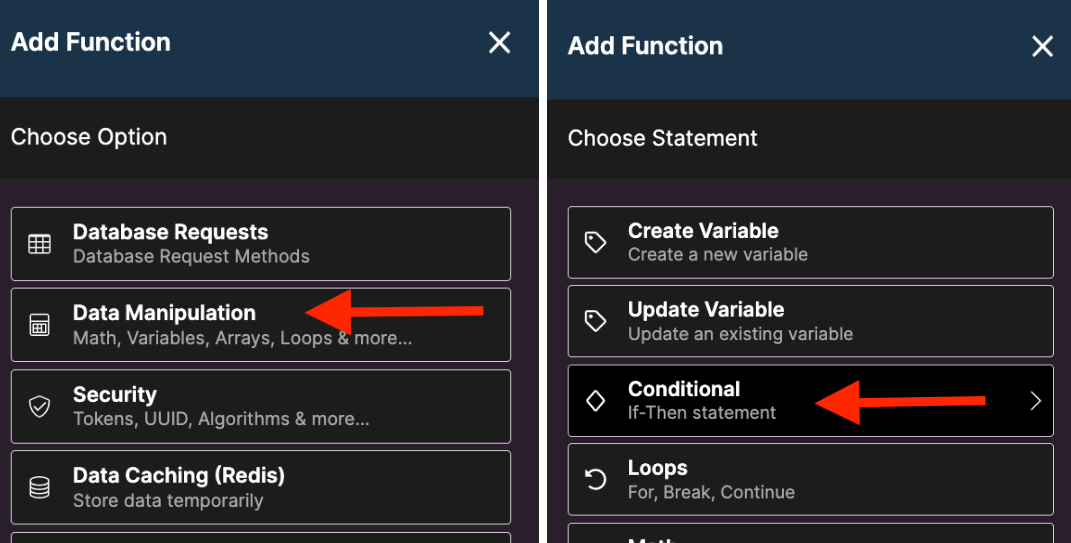
Once you select conditional, we can add the condition to check link is empty.
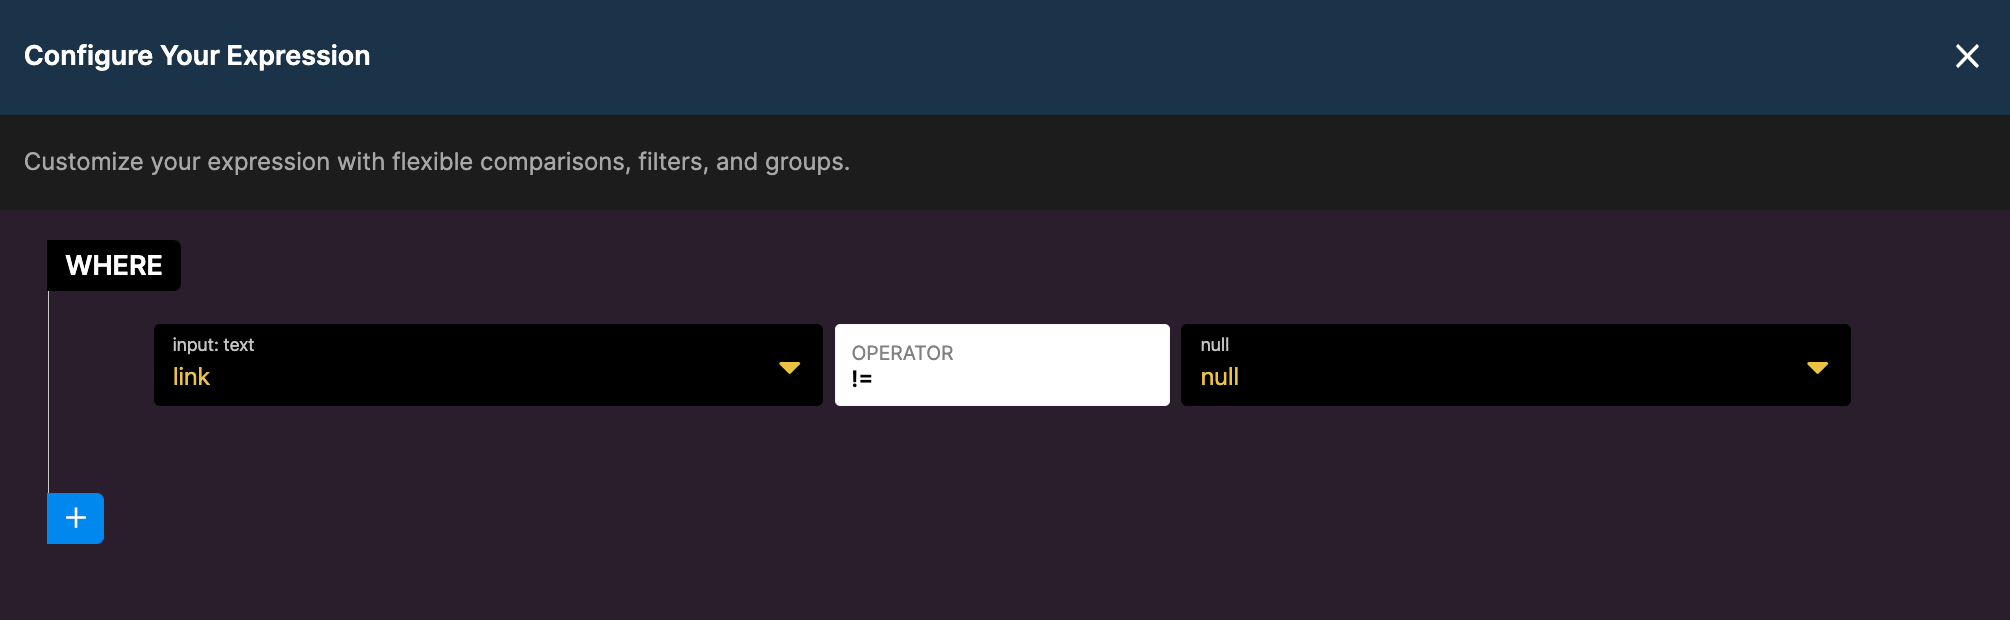
If the link is not null (empty), we have to add the records to the table.
After the condition is added, you will see the updated Function stack as below.
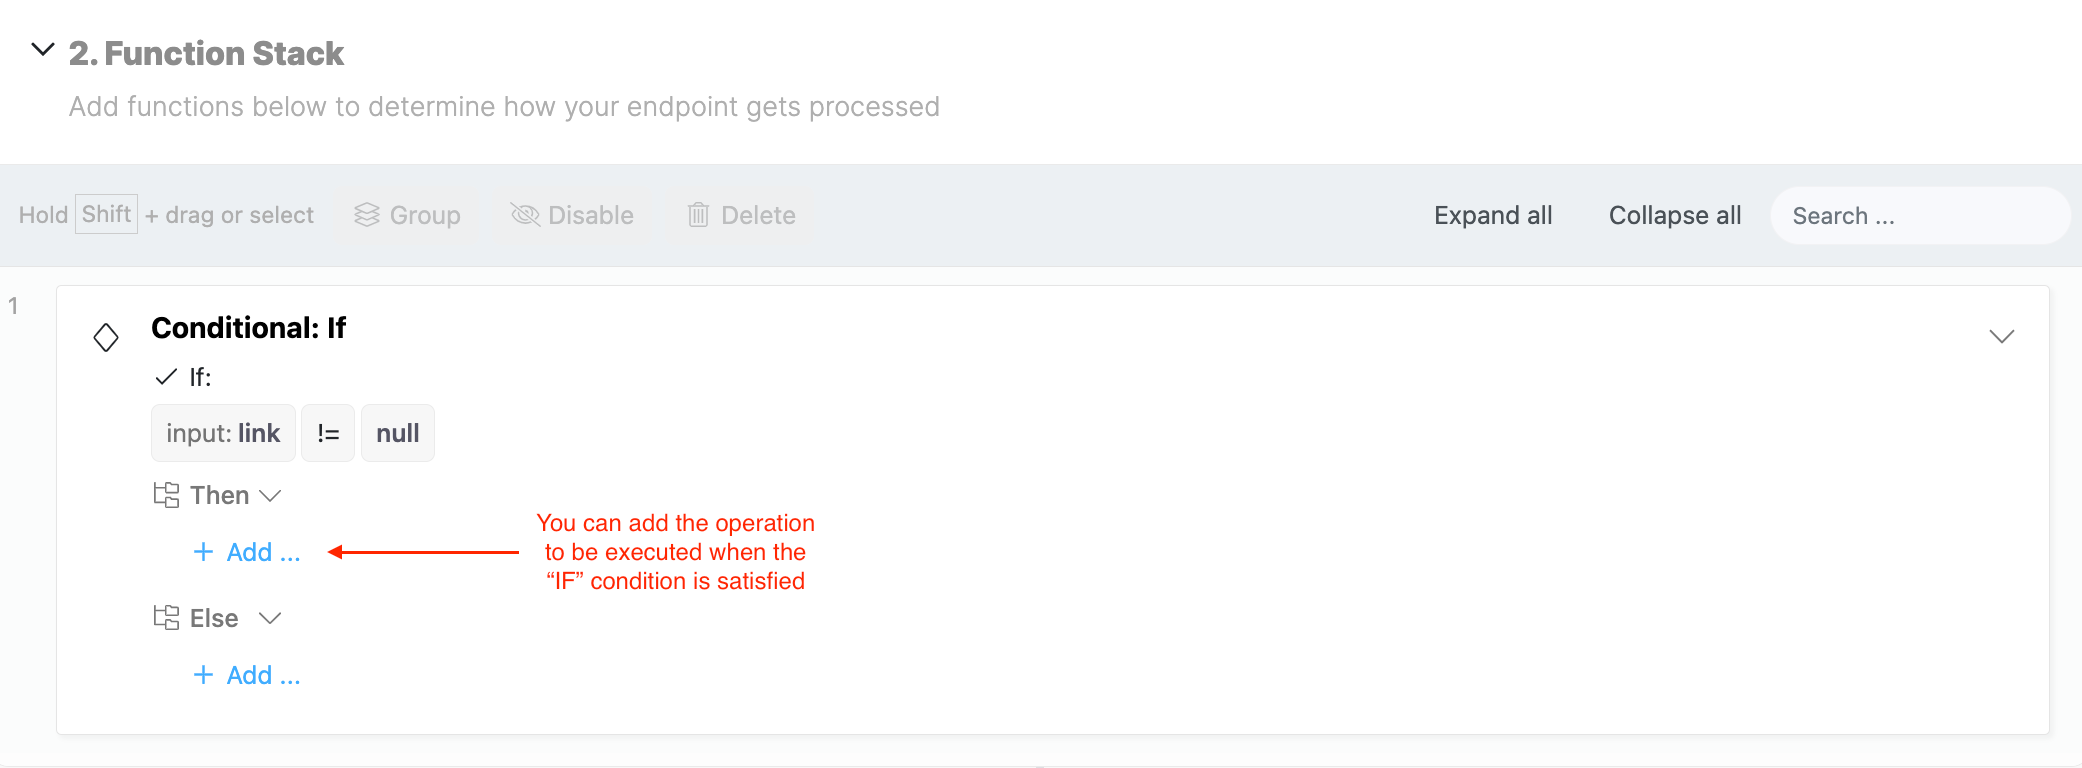
Click on “Add” and these will be the steps to follow to add the function:
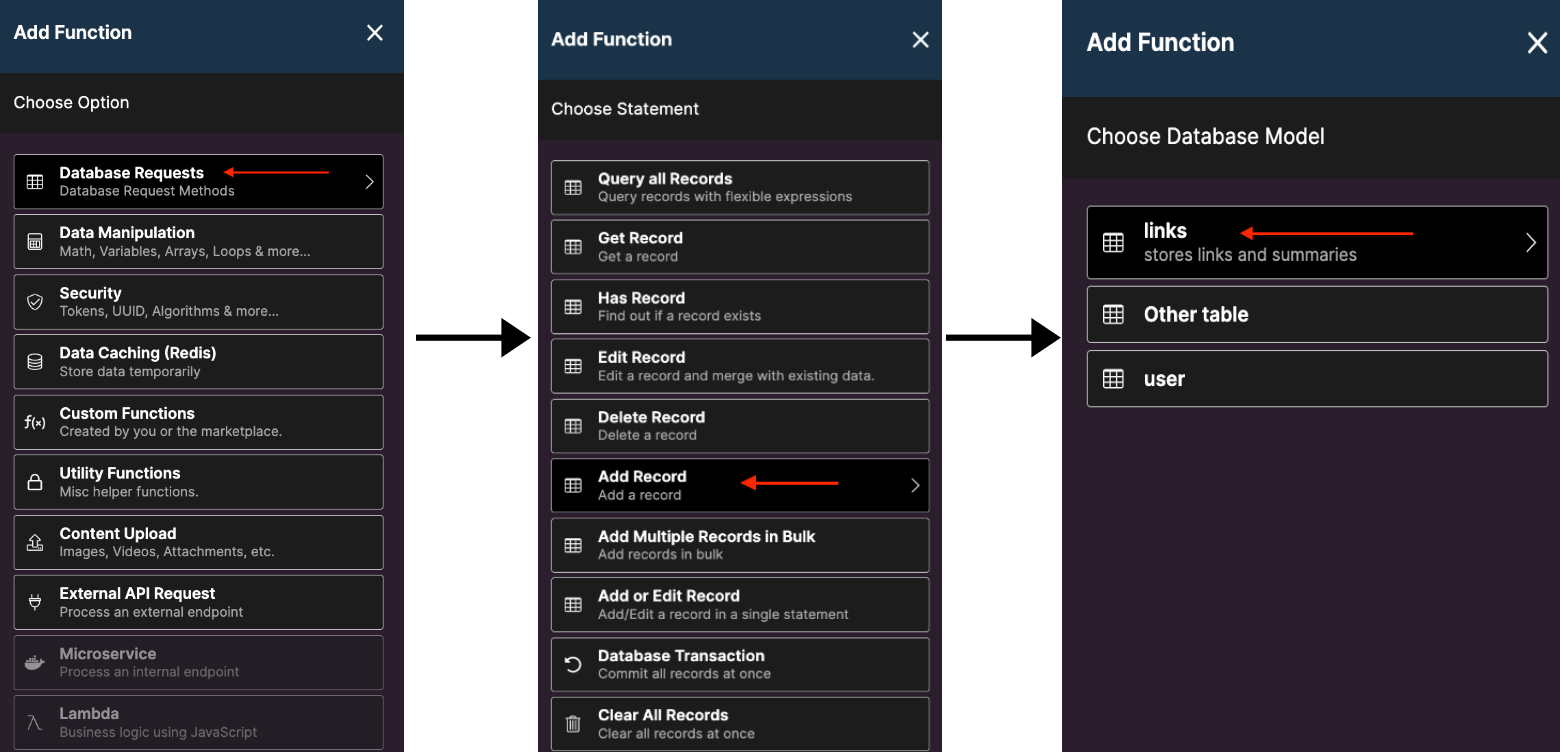
When the “if” statement returns true, a new record is added to the “links” table.
ELSE Statement:
What should happen when the IF statement is not satisfied? That is when the ELSE statement should get executed. According to our case, it should throw an error. For this, we will be creating an object which gets called when the link is null, and hence the value of the object will be returned.
Let us create an object:
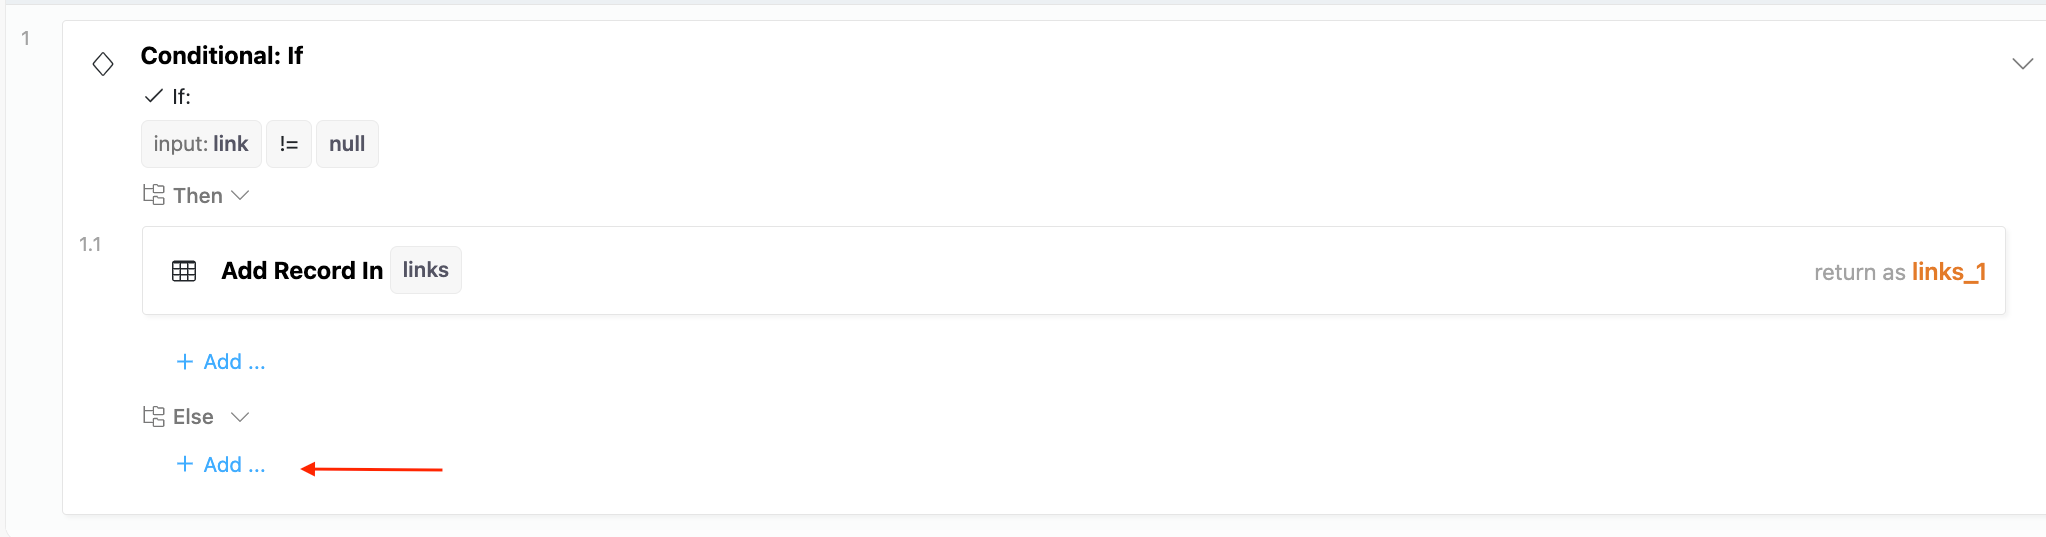
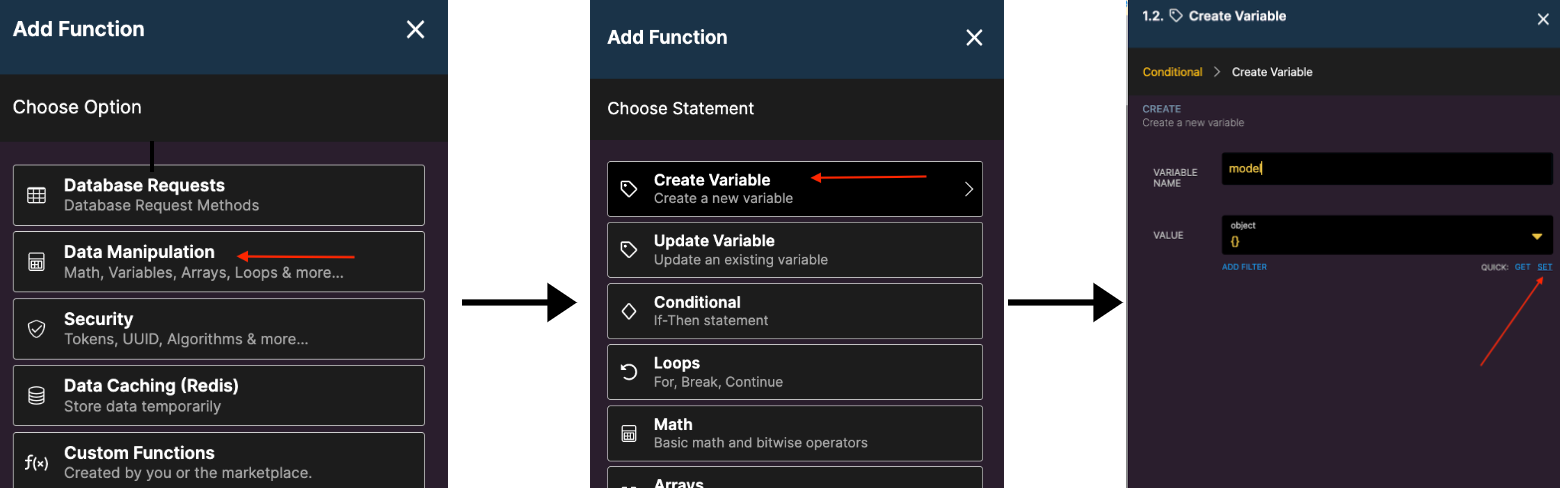
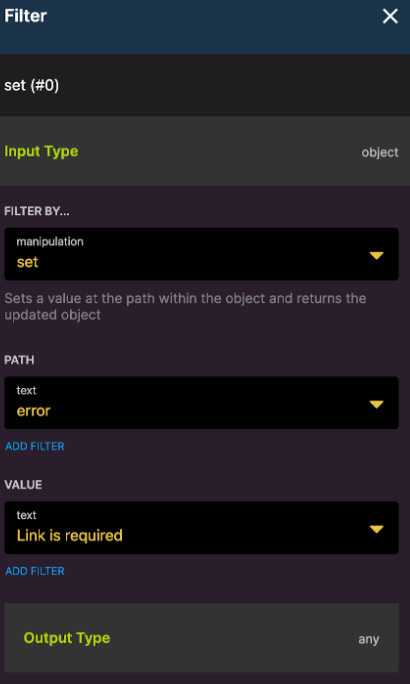
The value for the variable can be assigned using SET method:
The path and value I have given here are “error” and “Link is Required”. These will be stored in the variable “model” and will be executed whenever the variable is thrown.
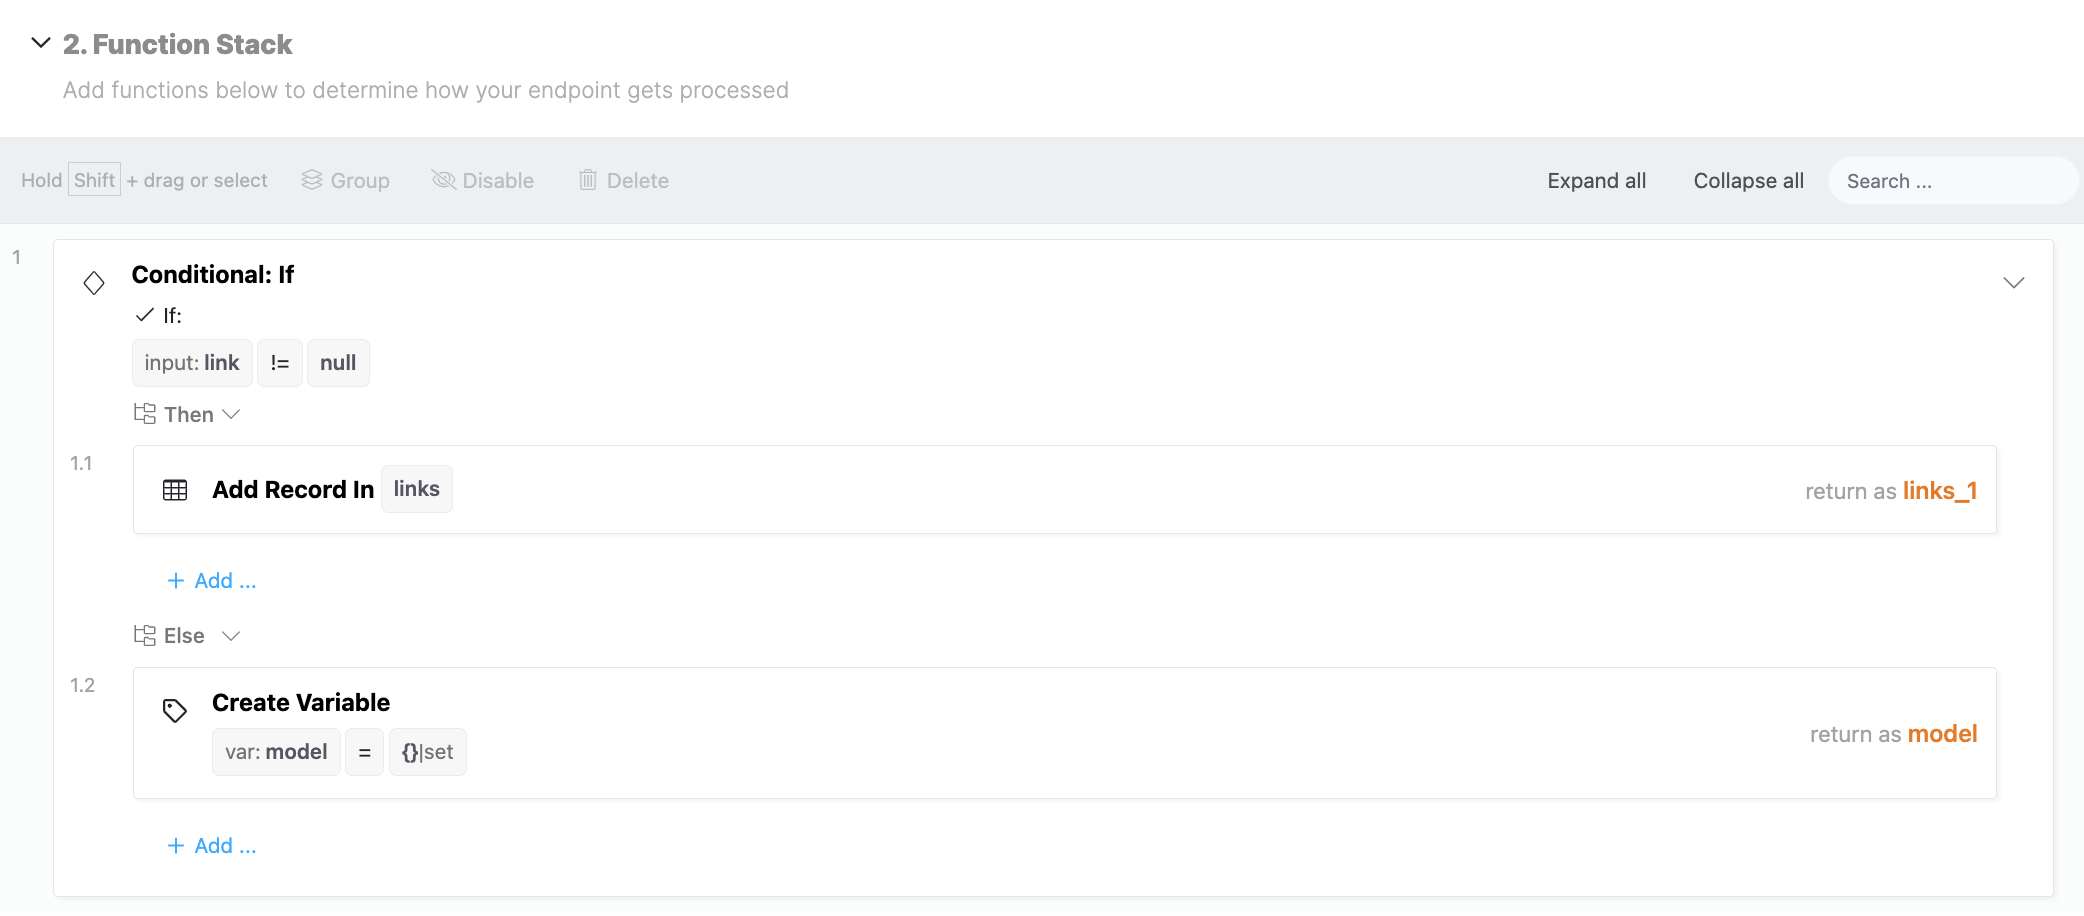
Once you update and save your variable, this will be your function stack:
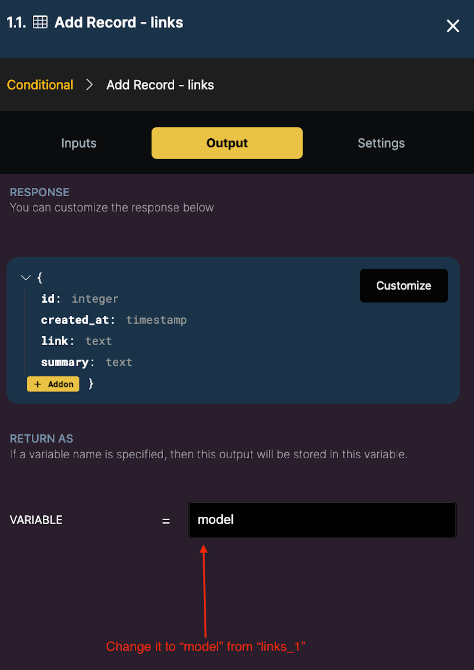
In order for the object to get returned when it is thrown, we have to make sure that the If statement and the output are returning the same object variable.
Here, as you can see, I have “links_1” as my return variable in my If statement. We will be renaming it to “model” so that the object variable with the same name is returned.
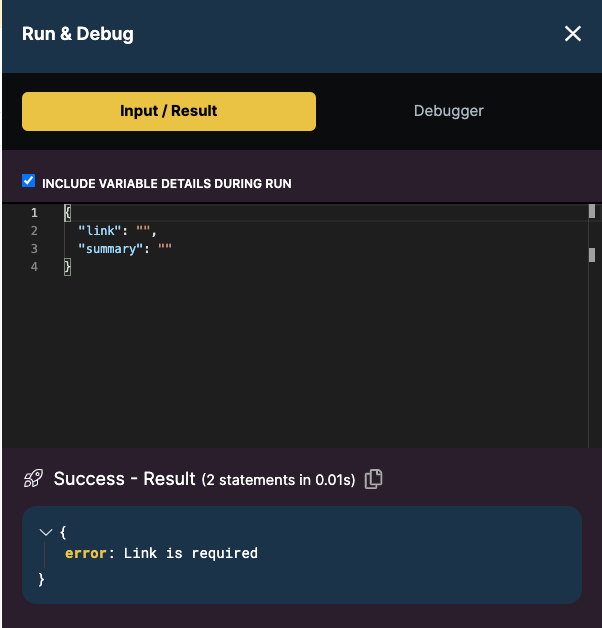
Let us try running this stack to ensure its functionality before deploying it. When a null value is given in the link field, we receive the error message (as per the else condition).
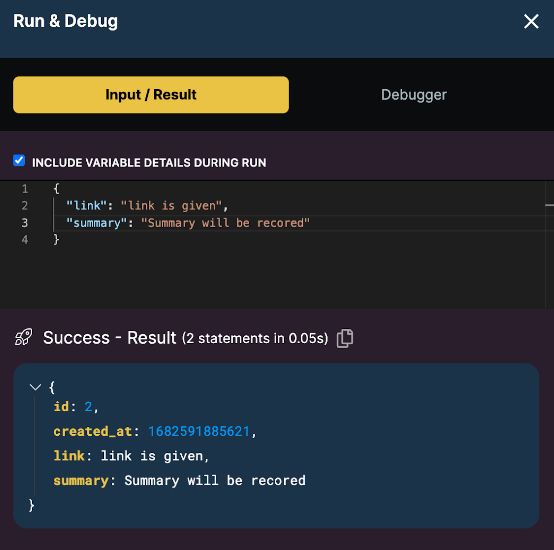
Once we give some values to the “link” and “summary”, our data is saved into our links table.
Once you are satisfied with your API build, make sure to “Publish” it to save them (else they will remain in the draft state).
/read_links API
Let us try creating an API that queries the record and gives them in descending order of their ID. Our operation is to get records from the table, hence we will be choosing GET.
The process of creating a new API endpoint is the same as above except, we will be selecting GET operation instead of POST.
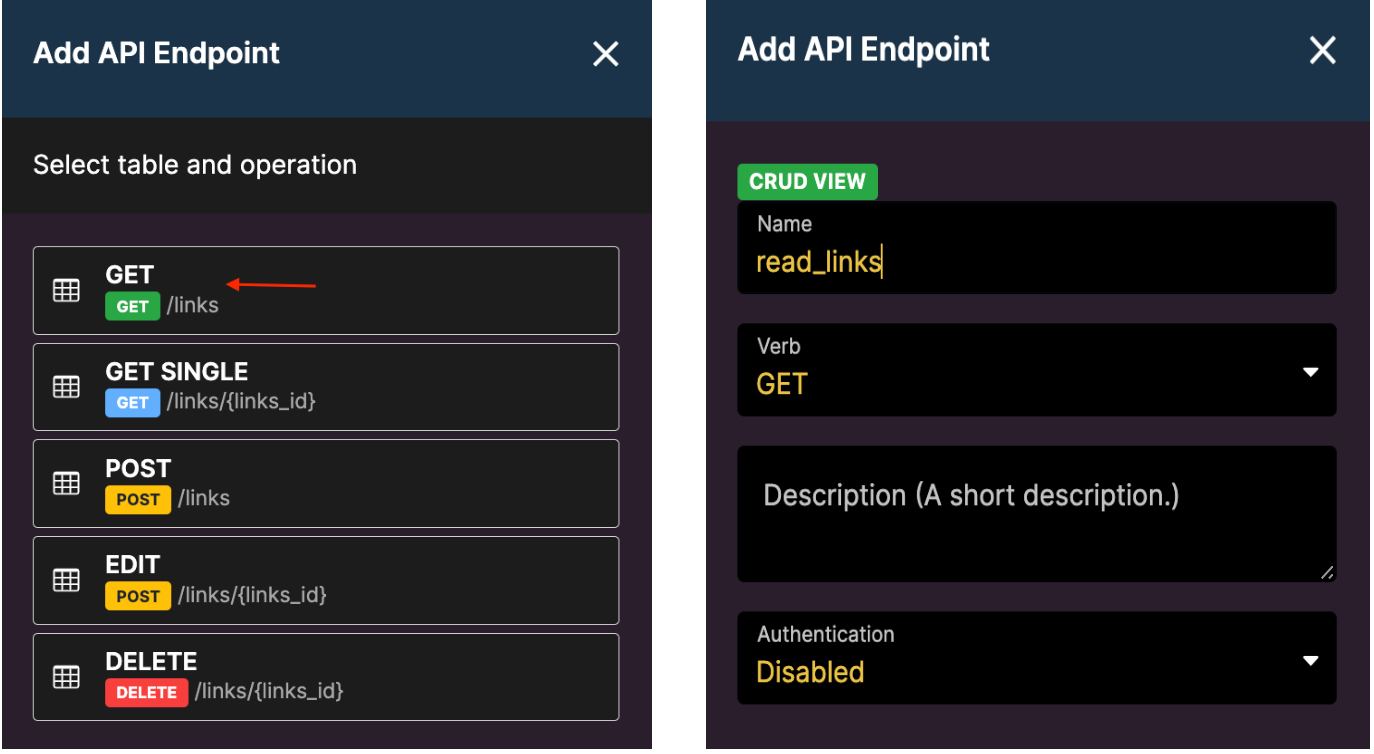
You might already have “Query all records from ” on your function stack. If you click on it and navigate to the output tab, you might see:
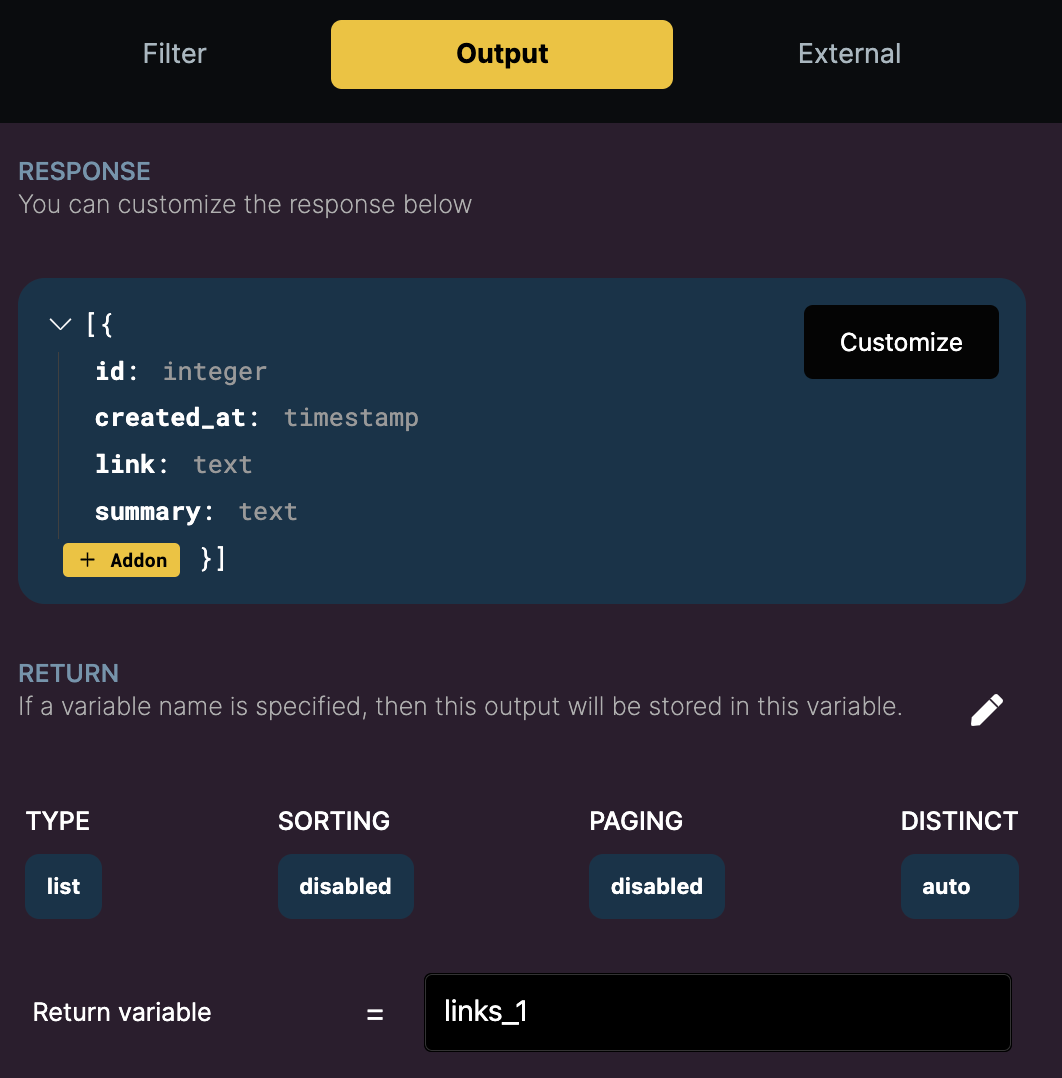
You can see that we have the following options to change the output return from the query.
- Type tells you what type of output you are expecting. It can be a list where the list of records is returned or it can be a single where only one of the records is returned (the first record).
- Sorting helps to sort the list in ascending or descending order. In our case, we want it in descending order.
- Paging limits the records sent on every request to the link.
- Distinct allows you to toggle the return of unique records.
Once you click on the edit symbol:
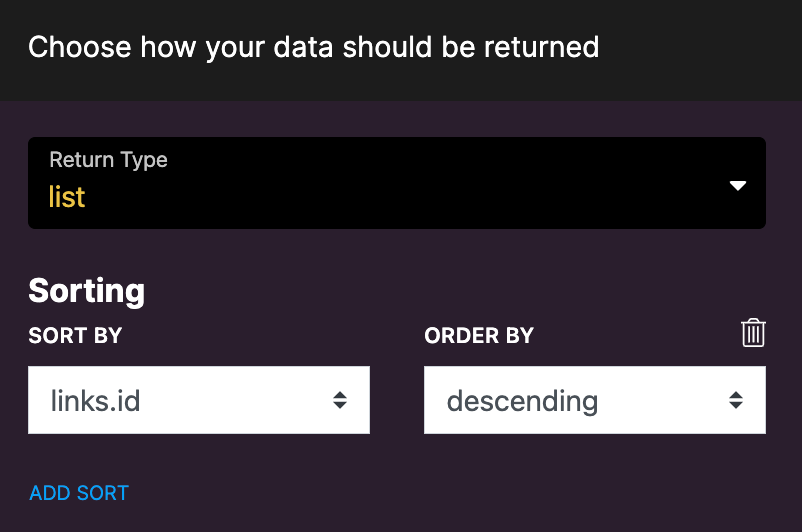
Now the output will a list of records that are sorted in descending order based on the ID field of the “links” table. Save the changes.
Note: To remind you again, make sure your function stack return variable and output return variable are the same. I changed my function stack return variable from links_1 to model so that it matches the output return variable.
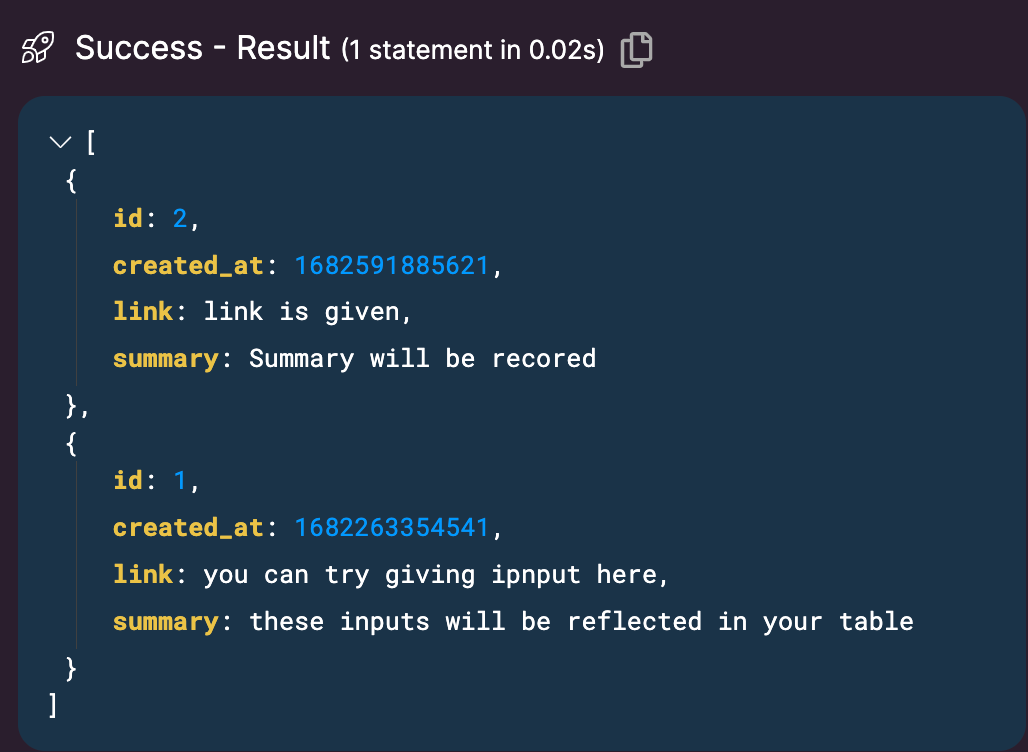
When you go for “Run & Debug”, you can see the result sorted in descending order.
Try using Delete and Edit API endpoints to get a better understanding of how robust these APIs can be utilized to be.
Conclusion
Voila, now we have a functioning backend that is ready to be integrated into your front end. Today’s experiment has only scratched the surface of what Xano can be used for.
You can play around and design your case-specific database and APIs without involving any codes in a matter of minutes instead of going through the ordeal of coding complex programs to do the same.
Let me know your thoughts in the comments below and if you have any questions.
Edited and Curated by
for Coffee.