Read with Claude
 Read with ChatGPT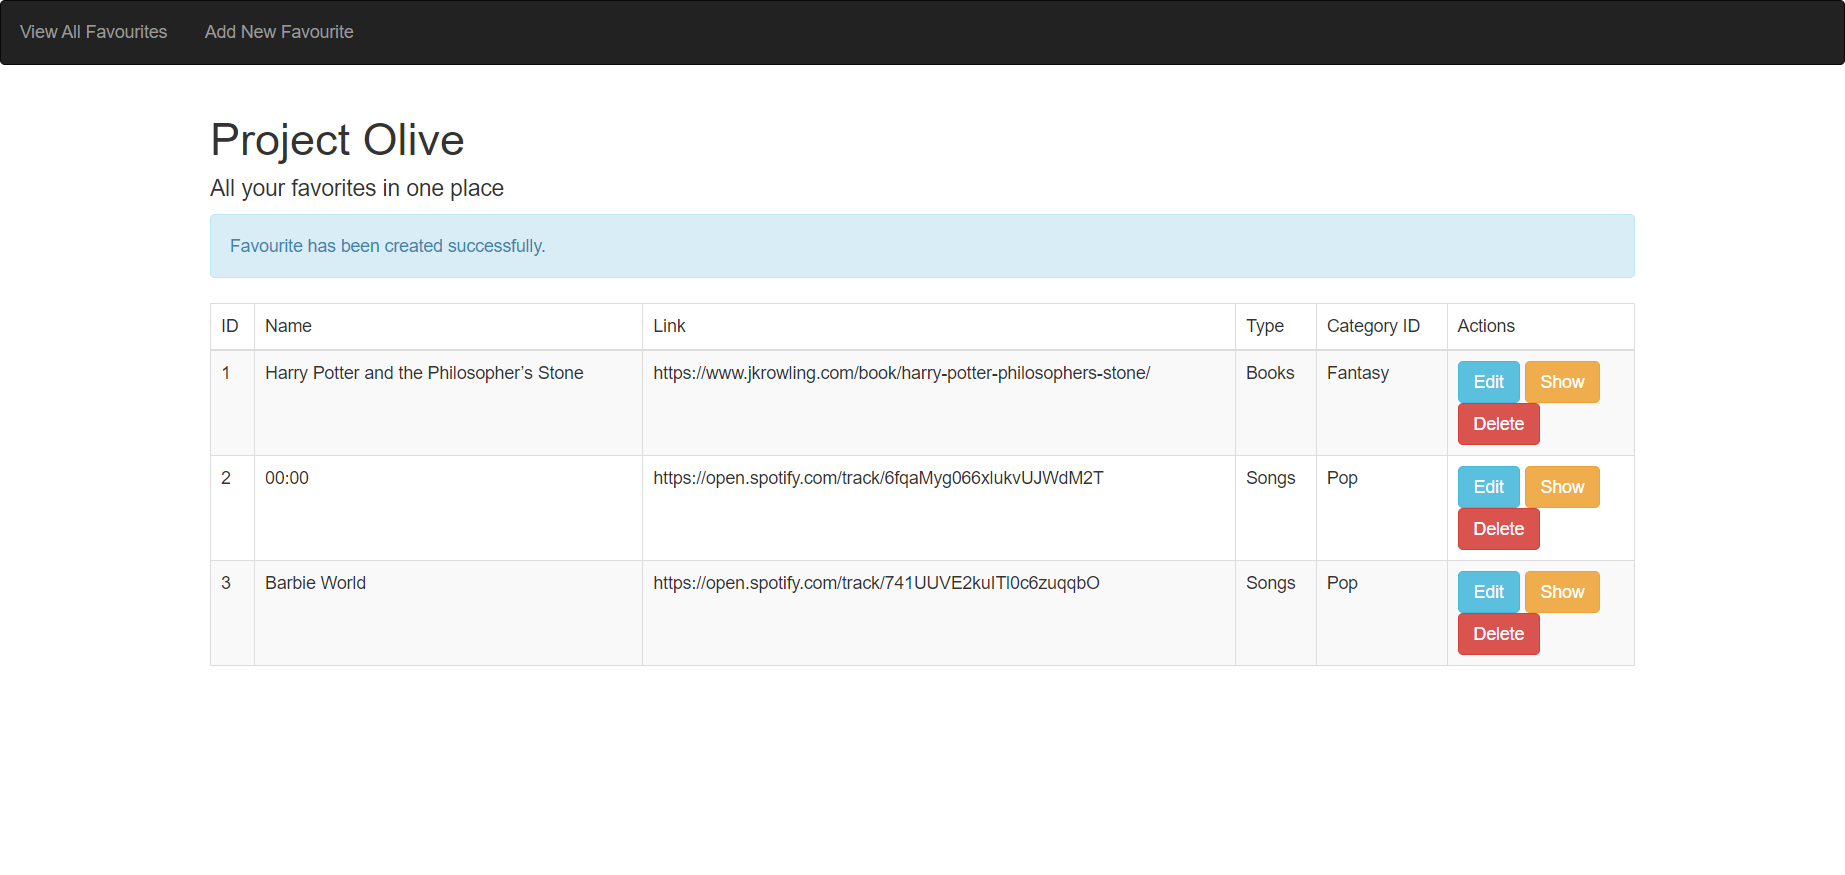
In this article, we are going to leverage the Laravel framework and build a CRUD application called project “Olive”.
Laravel is a web application framework that provides easy and elegant syntax to create and develop your projects. It follows an MVC framework. MVC stands for Model View Controller.
- The data used by the web application is handled by the Model.
- The View is used to display the data to the user.
- The Controller interacts with the View and Model by handling the data and grouping all the requests.
What is Project “Olive”?
Everyone is a fan of one thing or the other. One can be a bookworm while the other stays loyal to movies, and be a cinephile. And who doesn’t listen to music? Everyone loves music. One can even be an all-rounder and love all of the above like ‘ME!’
Just like our favorite list grows and changes, so does our mood. At the moment, we may want to listen to music and then the sudden urge to binge-watch a series of movies rises. The main task is to search for that particular ‘favorite’. At times, it can be time-consuming and you may even lose the urge to watch it. Guess what? That’s what Project “Olive” is all about.
The idea behind OLIVE is to allow users to save their favorites. OLIVE helps you to store your favorites all together in one place. You can even categorize them by their type and categories.
Excited?! Let’s get started!
Before we get into the project, I would like to give you a picture of what exactly we are going to build.
Project Olive — All your favorites in one place
1. Setting Up your Laravel Project
The first step in Laravel is the installation of PHP and Composer. If you are developing on macOS, PHP and Composer can be installed within minutes via Laravel Herd.
After installation, you can create your Laravel project in two ways, via Composer and by installing Laravel globally as follows,
1. via Composer create-project command:
composer create-project laravel/laravel project-olive2. By installing Laravel globally via Composer:
composer global require laravel/installer
laravel new project-olive
After running either of the above commands, a new folder will be created with the name project-olive and all the required dependencies for Laravel would have been installed. Change into this directory to proceed further.
cd project-oliveYou can start the Laravel’s local development server by using the following command.
php artisan serveOnce you have started the Artisan development server, your application will be accessible in your web browser at http://localhost:8000.
2. Creating Database and Models
Now that your project has been created, let us proceed to create a database so that we can save data persistently. Your project’s environment based configuration file **.env** specifies the database you are interacting with. In this case, we are going to be making use of a MySQL database.
You can install XAMPP, which provides an appropriate environment for testing MYSQL, PHP, Apache, and Perl projects. You can also make use of TablePlus, which acts as an interface to connect to your MySQL Server. Once you have started your MySQL server and connected to it using TablePlus, create a database called olive.
Update your database credentials in the **.env** configuration and specify the name of the database.
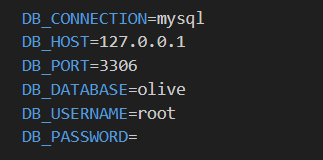
With the database created and the connection set using the .env file, we can now proceed to create tables. OLIVE requires the following tables:
- Types : used to store the types such as music, movie, novel and series.
- Categories : used to store various categories like pop, hip hop, romance, mystery and drama.
- Favorites : used to store favorites data
Models
Laravel uses Eloquent, an Object Relational Mapper (ORM), which makes it easy to interact to the database. When using Eloquent, each database table has a corresponding “Model” that is used to interact with that table. In addition to retrieving records from the database table, Eloquent models allow you to insert, update, and delete records from the table as well.
So, we need to create a model that corresponds to each of the tables. In addition to the model, we will also need to create a migration to create the table and add the required columns. Migrations are used to easily build your application’s database schema. Each migration file contains the schema to create or modify your tables in the database.
We make use of the Artisan command make:model to create a new model, with the parameter -m to create a migration.
php artisan make:model Category -mModels are created in the app/Models directory and migrations will be placed in the database/migrations directory.
Naming Conventions for Models:
- Models should be named in singular after the table they are to be associated with. So, in the case of creating a model for the table
categoriesthe model should be namedCategory. - Ensure that your model starts with an upper-case letter and follows CamelCase.
So in similar form, run the following commands to create models for types and favorites.
php artisan make:model Type -m
php artisan make:model Favorite -m
Each migration filename contains a timestamp that allows Laravel to determine the order of the migrations. So, models with dependencies on other models (like Favorite) should be created after the base models (like Category and Type).
On a additional note, you may use the make:migration Artisan command to generate a database migration directly. The standard to naming a migration that creates a new table is to name it “create_<table_name>_table”, where <table_name> should be replaced with the name of your table.
php artisan make:migration create_categories_tableLaravel will use the name of the migration to attempt to guess the name of the table and whether or not the migration will be creating a new table.
3. Building Tables using Migrations
After the models and migrations are created, we can now edit the migrations with the required columns for each table. Like I mentioned before, you can find it in your **database\migrations** folder.
Every migration has 2 functions created by default:
- up() — This function is called when the
migratecommand is called. This function is usually used to create tables. - down() — This function is called when the
migrate:rollbackcommand is called, usually to undo migrations. It is usually where the tables are dropped.
By default, Laravel creates the id() and timestamps() functions in a migration. These functions add the following columns to your table:
- id
- created_at
- updated_at
We can update existing migrations by creating our own columns. For OLIVE, we will modifying the following migrations:
a. types
We need to add the following two columns with the corresponding data types to the types migration:
- name — string
- description — longText
<?php

use Illuminate\Database\Migrations\Migration;
use Illuminate\Database\Schema\Blueprint;
use Illuminate\Support\Facades\Schema;

return new class extends Migration
{
    /**
     * Run the migrations.
     */
    public function up(): void
    {
        Schema::create('types', function (Blueprint $table) {
            $table->id();
            $table->string('name');
            $table->longText('description')->nullable();
            $table->timestamps();
        });
    }
    /**
     * Reverse the migrations.
     */
    public function down(): void
    {
        Schema::dropIfExists('types');
    }
};
b. categories
The categories migration is similar to the types migration, with the following 2 columns:
- name — string
- description — longText
<?php

use Illuminate\Database\Migrations\Migration;
use Illuminate\Database\Schema\Blueprint;
use Illuminate\Support\Facades\Schema;

return new class extends Migration
{
    /**
     * Run the migrations.
     */
    public function up(): void
    {
        Schema::create('categories', function (Blueprint $table) {
            $table->id();
            $table->string('name');
            $table->longText('description')->nullable();
            $table->timestamps();
        });
    }

    /**
     * Reverse the migrations.
     */
    public function down(): void
    {
        Schema::dropIfExists('categories');
    }
};
c. favorites
We need to add the following two columns with the corresponding data types to the types migration:
- name — string
- link — string
- type — bigInteger (refers to the
typestable using foreign key) - category_id — bigInteger (refers to the
categoriestable using foreign key)
<?php

use Illuminate\Database\Migrations\Migration;
use Illuminate\Database\Schema\Blueprint;
use Illuminate\Support\Facades\Schema;

return new class extends Migration
{
    /**
     * Run the migrations.
     */
    public function up(): void
    {
        Schema::create('favourites', function (Blueprint $table) {
            $table->id();
            $table->string('name');
            $table->string('link');
            $table->bigInteger('type_id')->unsigned();
            $table->foreign('type_id')->references('id')->on('types');
            $table->bigInteger('category_id')->unsigned();
            $table->foreign('category_id')->references('id')->on('categories');
            $table->timestamps();
        });
    }

    /**
     * Reverse the migrations.
     */
    public function down(): void
    {
        Schema::dropIfExists('favourites');
    }
};
The App/Favorite Model
As you can see in the migration for the favorites table, type_id and category_id are columns referring to their respective tables. Laravel provides us with the option to create relationships between tables. In this case, we can setup a hasOne relationship between the models.
<?php

namespace App\Models;

use Illuminate\Database\Eloquent\Factories\HasFactory;
use Illuminate\Database\Eloquent\Model;

class Favorite extends Model
{
    use HasFactory;

    public function type()
    {
        return $this->belongsTo(Type::class);
    }

    public function category()
    {
        return $this->belongsTo(Category::class);
    }
}
This will be useful when we want to retrieve names of categories and types based on id saved in the favorites table.
Running your migrations
To ensure that all the models(tables) are successfully created in your database, you may need to run an Artisan command for migration.
php artisan migrateYou can also rollback the migrations and re-run the migration when you make changes to your models. The command is as follows,
php artisan migrate:rollbackLaravel provides another Artisan command to perform both the above commands together. This command is named as migrate:fresh.
php artisan migrate:freshThe fresh command drops all the tables and eventually re-runs all the migrations. The drawback of migrate:rollback and migrate:fresh command is that you can retain only your tables but may lose your application data. So, proceed with caution!
4. Routing your App URLs
Routes are a way of accessing your views by creating a request URL for your application. You can find it in your routes\web.php directory. The default route to your welcome.blade.php is specified in the web.php.
You can create new routes to your views by specifying the path, method, controller or the specified class. You can also use wildcards, slugs and variables to specify your routes.
Before we create new routes, we will need to create a controller to hold our functional logic. Controllers can group related request handling logic into a single class. They can be used to connect the route to the view.
For example, in our case, the FavoriteController class will handle all incoming requests related to favorites, including showing, creating, updating, and deleting users.
You can create a controller using the make:controller Artisan command.
php artisan make:controller FavoriteControllerBy default, controllers are stored in the app/Http/Controllers directory. Below you can see an empty controller.
<?php

namespace App\Http\Controllers;

class FavouriteController extends Controller
{

}
Once you create your controller, you can head over to routes/web.php to add the required routes for our application. One of the important aspects in routing is the usage of methods. Laravel provides various methods like get(), post(), delete() and put(). The usage is as follows,
- The get() method is used to retrieve data from a specific resource.
- The post() method is used to submit data to be processed to a specific resource.
- The put() method is used when you need to edit or update the data.
- The delete() method is used to delete data from a specific resource.
We need to create the routes for each of the following URLs and connect it to the FavoriteController.
a. index — for listing all items
Route::get('/favorites', [FavoriteController::class, 'index'])
    ->name('favorites.index');
b. create — To show the view for creating a new item
Route::get('/favorites/create', [FavoriteController::class, 'create'])
    ->name('favorites.create');
c. store — to post & save data from create page
Route::post('/favorites', [FavoriteController::class, 'store'])
    ->name('favorites.store');
d. show — To show a single item
Route::get('/favorites/{favorite}', [FavoriteController::class, 'show'])
    ->name('favorites.show');
e. edit — to view edit page for a single item
Route::get('/favorites/{favorite}/edit', [FavoriteController::class, 'edit'])
    ->name('favorites.edit');
f. update — to put and update data from edit page
Route::put('/favorites/{favorite}', [FavoriteController::class, 'update'])
    ->name('favorites.update');
g. delete — handles delete operation
Route::delete('/favorites/{favorite}', [FavoriteController::class, 'destroy'])
    ->name('favorites.destroy');
You can also make use of the Route::resource to create your route.
Route::resource handles all routes (Route::get, Route::post, Route::put, Route::delete). Instead of the 7 routes above, we can use Route::resource.
// alternatively instead of the 7 routes above, we can use Route::resource
Route::resource('favorites', FavoriteController::class);
5. Controlling your View
Now, let us add the logic for the actions we require in the controller and set up the corresponding views.
Controllers can return views to show screens to users. View is what is visible to the users. If you create a simple input form or display data, you need to specify it in the view. We will create a favs directory under resources\views to hold all our views related to the FavoriteController.
Creating the layout view
Laravel uses the blade templating engine that allows us to split our views into sections and make use of reuseable components. In this case, we are going to create a main layout component that we will reuse for all our views.
Create a file called main.blade.php in the resources/views/layout. The @yield('content') allows you to add content when this layout is extended.
<!DOCTYPE html>
<html>

<head>
    <title>OLIVE</title>
    <link rel="stylesheet" href="//netdna.bootstrapcdn.com/bootstrap/3.0.0/css/bootstrap.min.css">
</head>

<body>
    <nav class="navbar navbar-inverse">
        <div class="navbar-header">
            <ul class="nav navbar-nav">
                <li><a href="{{ route('favorites.index') }}">View All Favourites</a></li>
                <li><a href="{{ route('favorites.create') }}">Add New Favourite</a>
            </ul>
        </div>
    </nav>
    <div class="container">
        @yield('content')
    </div>
</body>

</html>
a. Display all favorites — index
First, we will get all data from the favorites table using the Favorite model and then pass it to the index view.
public function index()
{
    // to get all data
    $favorites = Favorite::all();
    // load view and pass favorites
    return View::make('favorites.index')->with(['favorites' => $favorites]);
}
View — index.blade.php
The index view is used to set the page for displaying all your data. We get the list of favorites and iterate through it to display it in the table.
@extends('layout.main')

@section('content')
    <h1>Project Olive</h1>
    <h4>All your favorites in one place</h4>
    <!-- will be used to show any messages -->
    @if (Session::has('message'))
        <div class="alert alert-info">{{ Session::get('message') }}</div>
    @endif
    <table class="table table-striped table-bordered">
        <thead>
            <tr>
                <td>ID</td>
                <td>Name</td>
                <td>Link</td>
                <td>Type</td>
                <td>Category ID</td>
                <td>Actions</td>
            </tr>
        </thead>
        <tbody>
            @if(sizeof($favorites) > 0)
            @foreach ($favorites as $key => $value)
                <tr>
                    <td>{{ $value->id }}</td>
                    <td>{{ $value->name }}</td>
                    <td>{{ $value->link }}</td>
                    <td>{{ $value->type->name }}</td>
                    <td>{{ $value->category->name }}</td>
                    <td>
                        <a class="btn btn-small btn-info" href="{{ route('favorites.edit', $value) }}">Edit</a>
                        <a class="btn btn-small btn-warning" href="{{ route('favorites.show', $value) }}">Show</a>
                        <form action="{{ route('favorites.destroy', $value->id) }}" method="Post">
                            @csrf
                            @method('DELETE')
                            <button type="submit" class="btn btn-danger">Delete</button>
                        </form>
                </tr>
            @endforeach
            @else
            <tr>
                <td colspan="6">No favorites found</td>
            </tr>
            @endif
        </tbody>
    </table>
@endsection
b. Add a new Favorite
To add a new favorite we will need to show the create view and get the values required to add a new favorite to the table.
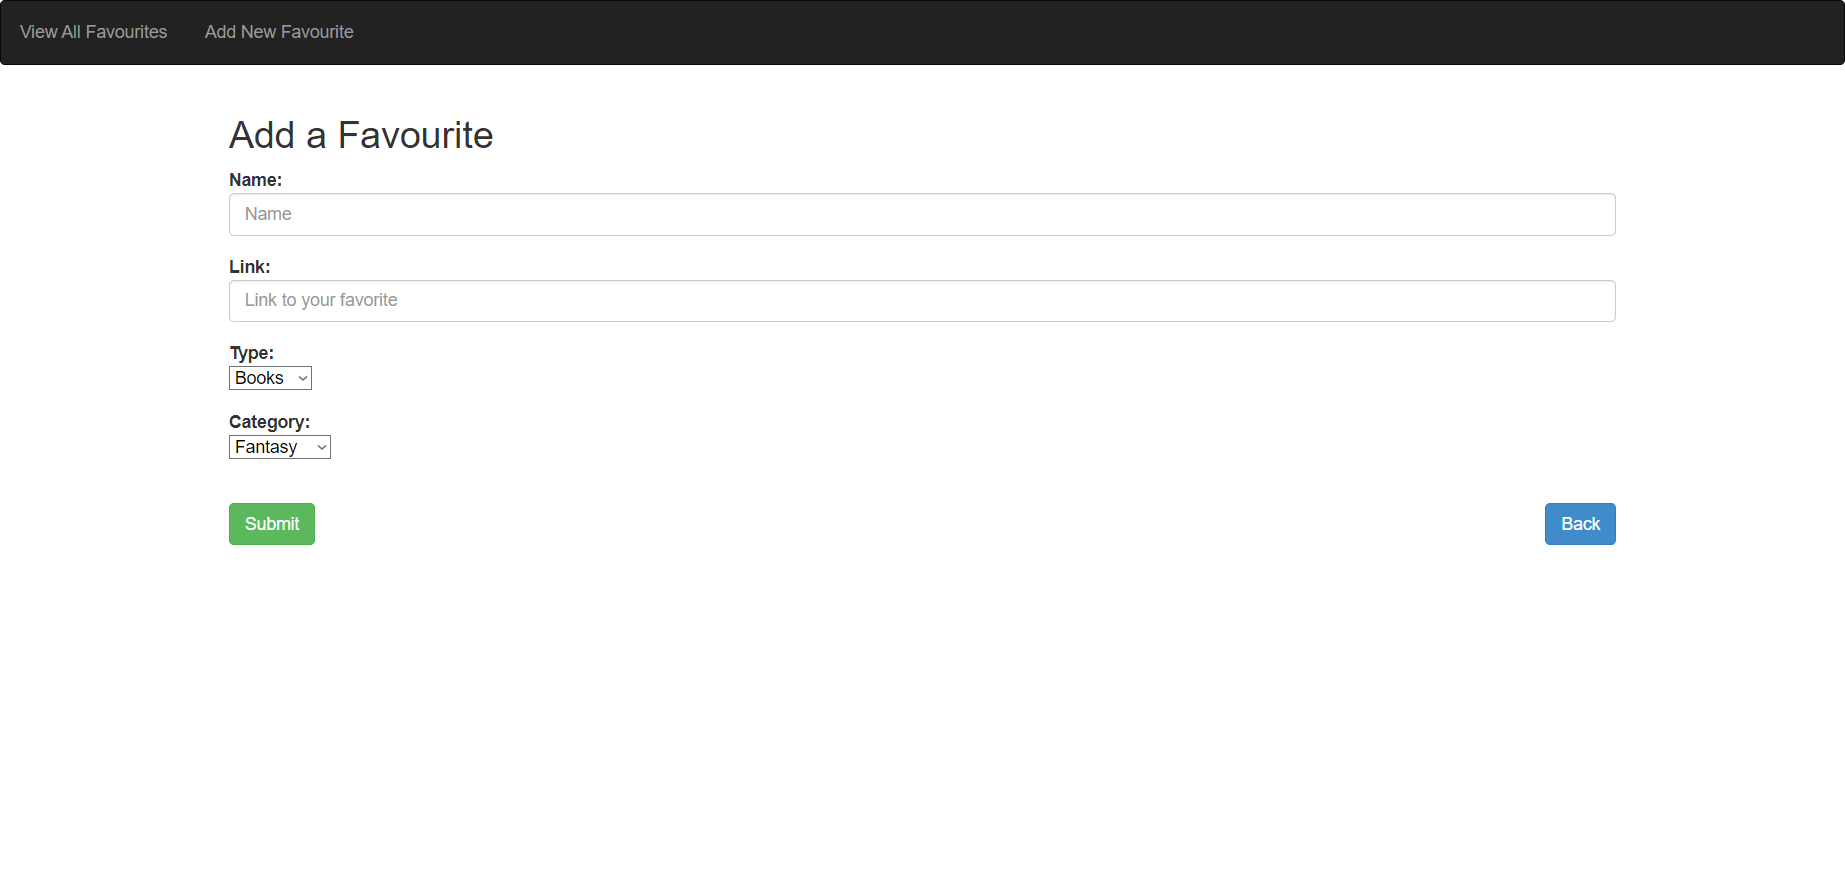
Let us call the View::make function to show the view and send the $categories and $types list which will be used for the dropdown.
public function create()
{
    $categories = Category::all();
    $types = Type::all();
    return View::make('favorites.create')
       ->with(['categories' => $categories, 'types' => $types]);
}
View — create.blade.php:
The create form in create.blade.php for a new favorite will have the following fields:
- Name
- Link
- Type (dropdown)
- Category (dropdown)
@extends('layout.main')

@section('content')
    <div class="container mt-2">
        <div class="row">
            <div class="col-lg-12 margin-tb">
                <div class="pull-left mb-2">
                    <h2>Add a Favourite</h2>
                </div>
            </div>
        </div>
        @if (session('status'))
            <div class="alert alert-success mb-1 mt-1">
                {{ session('status') }}
            </div>
        @endif
        <form action="{{ route('favorites.store') }}" method="POST" enctype="multipart/form-data">
            @csrf
            <div class="row">
                <div class="col-xs-12 col-sm-12 col-md-12">
                    <div class="form-group">
                        <strong> Name:</strong>
                        <input type="text" name="name" class="form-control" placeholder="Name">
                        @error('name')
                            <div class="alert alert-danger mt-1 mb-1">{{ $message }}</div>
                        @enderror
                    </div>
                </div>
                <div class="col-xs-12 col-sm-12 col-md-12">
                    <div class="form-group">
                        <strong>Link:</strong>
                        <input type="text" name="link" class="form-control" placeholder="Link to your favorite">
                        @error('link')
                            <div class="alert alert-danger mt-1 mb-1">{{ $message }}</div>
                        @enderror
                    </div>
                </div>
                <div class="col-xs-12 col-sm-12 col-md-12">
                    <div class="form-group">
                        <strong>Type:</strong>
                        <br/>
                        <select name="type" id="type">
                            @foreach ($types as $type)
                                <option value={{ $type->id }}>{{ $type->name }}
                                </option>
                            @endforeach
                        </select>
                        @error('type')
                            <div class="alert alert-danger mt-1 mb-1">{{ $message }}</div>
                        @enderror
                    </div>
                </div>
                <div class="col-xs-12 col-sm-12 col-md-12">
                    <div class="form-group">
                        <strong>Category:</strong>
                        <br />
                        <select name="category" id="category">
                            @foreach ($categories as $category)
                                <option value={{ $category->id }}>{{ $category->name }}
                                </option>
                            @endforeach
                        </select>
                        @error('category')
                            <div class="alert alert-danger mt-1 mb-1">{{ $message }}</div>
                        @enderror
                    </div><br>
                    <button type="submit" class="btn btn-success ml-3">Submit</button>
                    <div class="pull-right">
                        <a class="btn btn-primary" href="{{ route('favorites.index') }}"> Back</a>
                    </div>
        </form>
    </div>
@endsection
For the form action, we set it to route(‘favorites.store’), which will save the data entered in the form.
public function store(Request $request)
{
    $request->validate([
        'name' => 'required',
        'link' => 'required',
        'type' => 'required',
        'category' => 'required',
    ]);
    $data = new Favorite;
    $data->name = $request->name;
    $data->link = $request->link;
    $data->type_id = $request->type;
    $data->category_id = $request->category;
    $data->save();
    return redirect()->route('favorites.index')
        ->with('success', 'Favorite has been created successfully.');
}
c. Viewing a Favorite
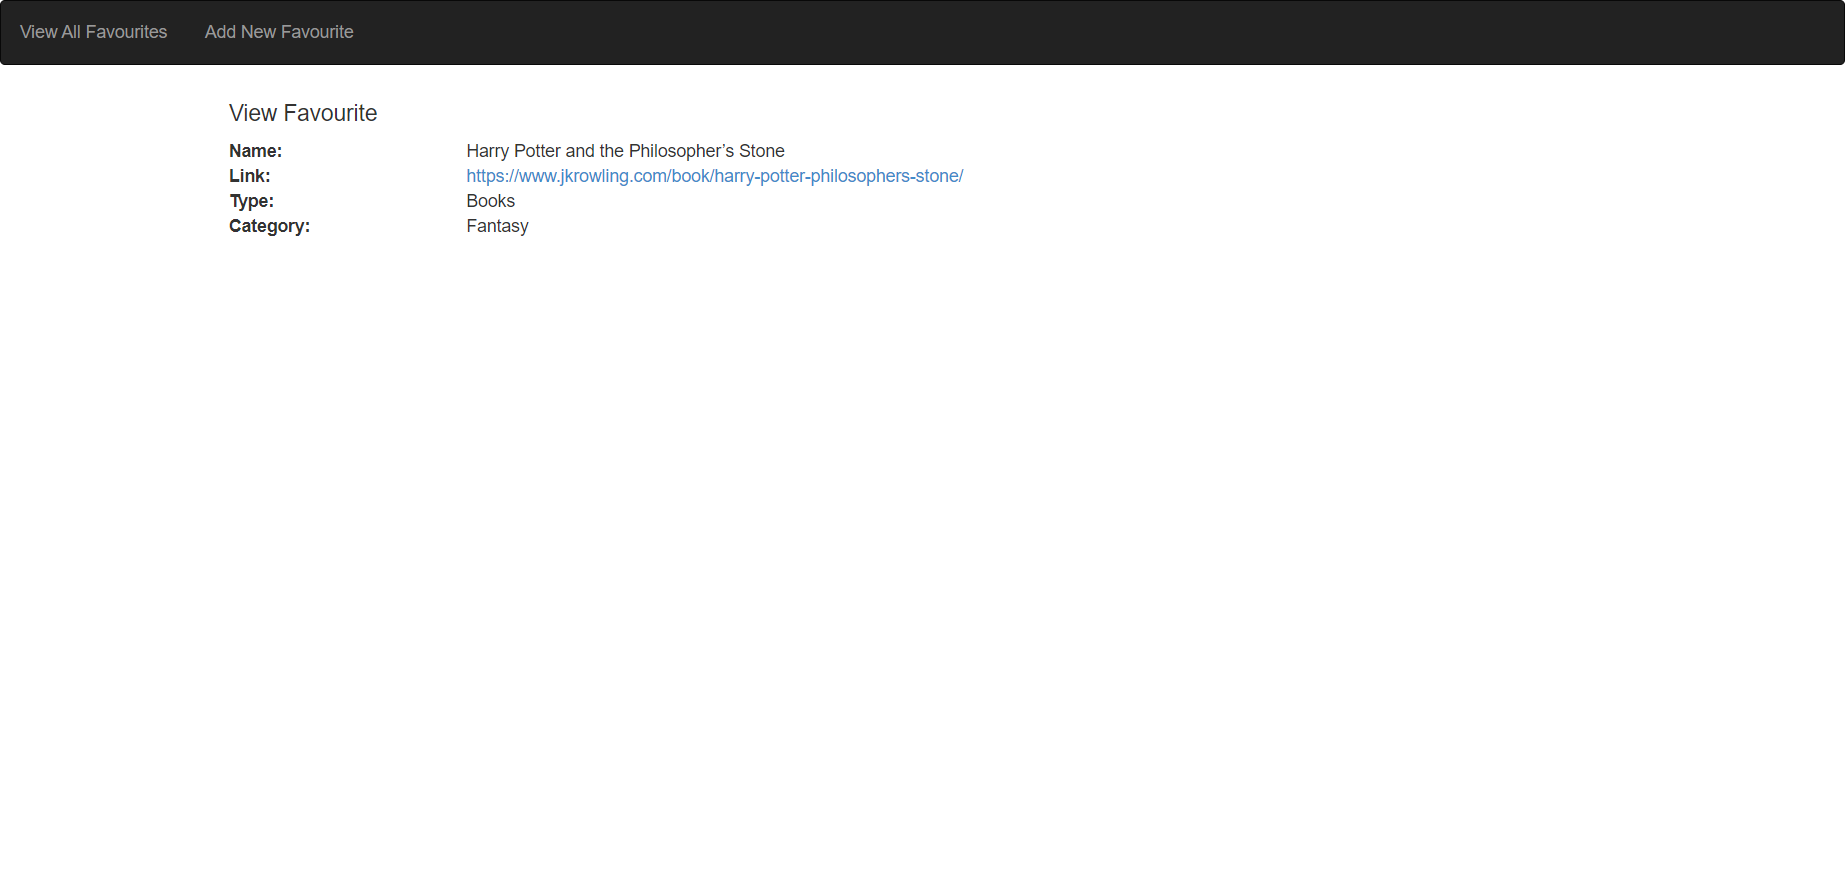
We will next create a view to see details of a favorite.
public function show($id)
{
    $favorite = Favorite::find($id);
    return View::make('favorites.show')->with(['favorite' => $favorite]);
}
The show view is used to display a particular data item(favorite) to the user.
@extends('layout.main')
@section('content')
    <div class="container mt-2">
        <div class="row">
            <div class="col-lg-12 margin-tb">
                <h4>View Favourite</h4>
            </div>
            <div class="col-xs-12 col-md-2">
                <strong>Name:</strong>
            </div>
            <div class="col-xs-12 col-md-10">
                {{ $favorite->name }}
            </div>
            <div class="col-xs-12 col-md-2">
                <strong>Link:</strong>
            </div>
            <div class="col-xs-12 col-md-10">
                <a href="{{ $favorite->link }}" target="_blank">{{ $favorite->link }} </a>
            </div>
            <div class="col-xs-12 col-md-2">
                <strong>Type:</strong>
            </div>
            <div class="col-xs-12 col-md-10">
                {{ $favorite->type->name }}
            </div>
            <div class="col-xs-12 col-md-2">
                <strong>Category:</strong>
            </div>
            <div class="col-xs-12 col-md-10">
                {{ $favorite->category->name }}
            </div>
        </div>
    </div>
@endsection
d. Updating a Favorite Item
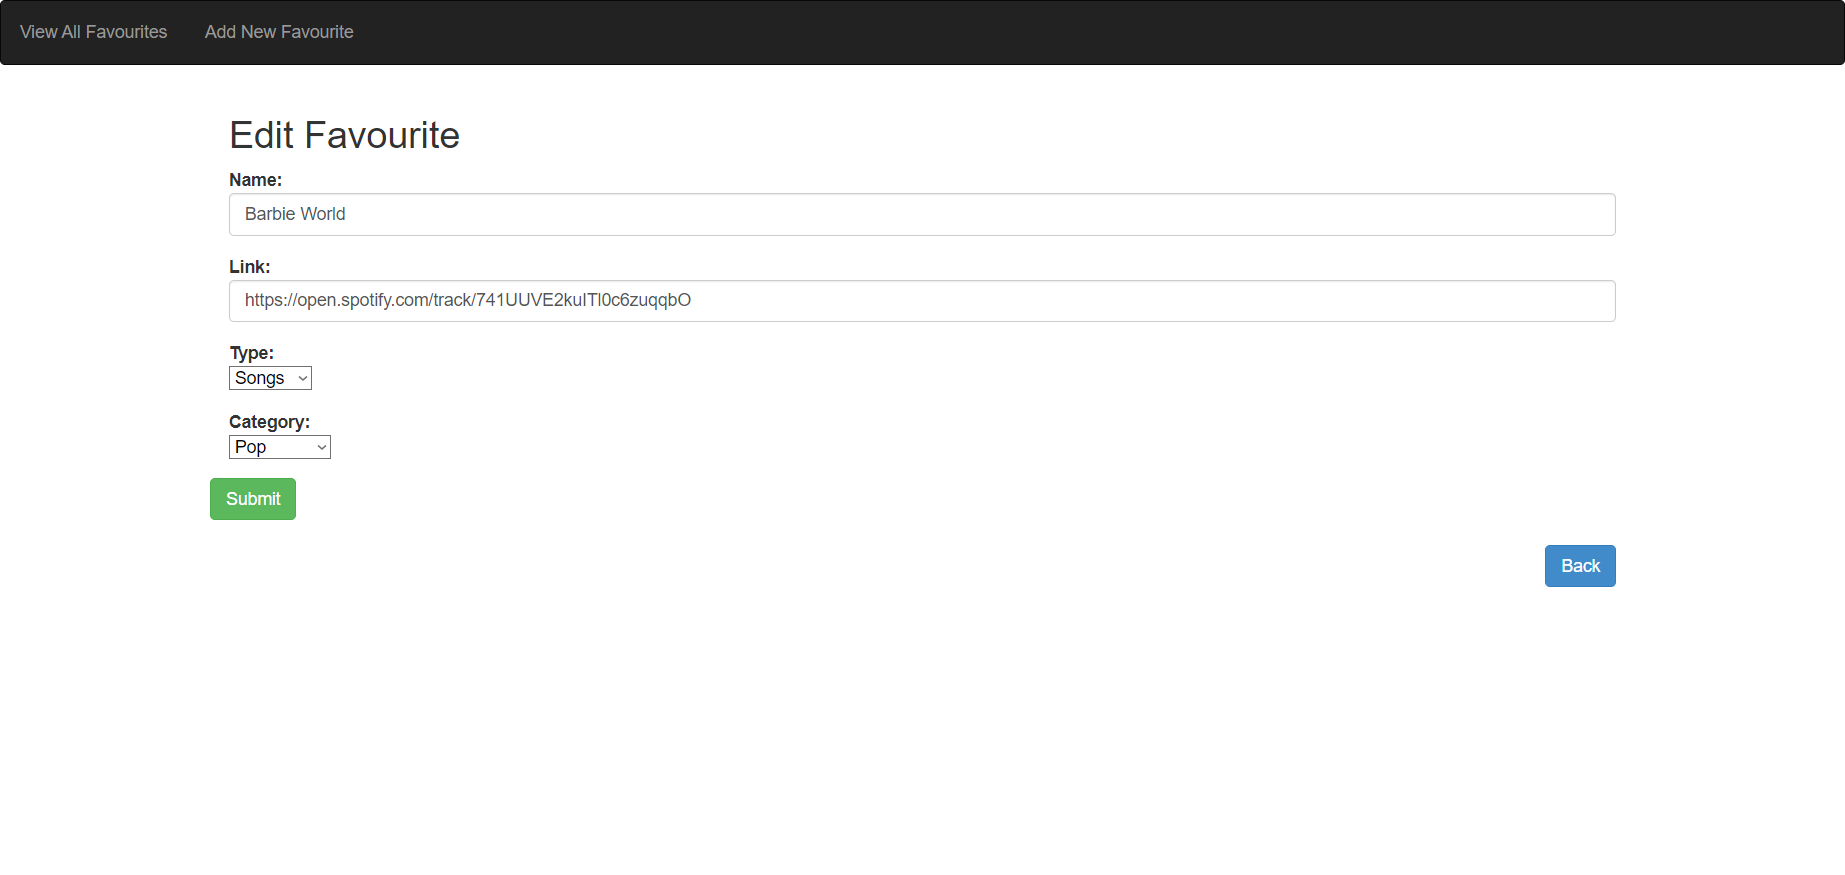
Updating a favorite item follows a similar pattern of create. An additional step is to find a favorite and send it to the view and then update the respective favorite in the table.
public function edit($id)
{
    $favorite = Favorite::find($id);
    $categories = Category::all();
    return View::make('favorites.edit')
        ->with(['favorite' => $favorite,  'categories' => $categories]);
}

public function update(Request $request, $id)
{
    $request->validate([
        'name' => 'required',
        'link' => 'required',
        'type' => 'required',
        'category' => 'required'
    ]);
    $data = Favorite::find($id);
    $data->name = $request->name;
    $data->link = $request->link;
    $data->type = $request->type;
    $data->categories_id = $request->category;
    $data->save();
    return redirect()->route('favorites.index')
        ->with('success', 'Company Has Been updated successfully');
}
View — edit.blade.php:
The edit view is used to build the edit page. Here, we also include displaying the already saved data which can be modified or updated by the user.
@extends('layout.main')
@section('content')
    <div class="container mt-2">
        <div class="row">
            <div class="col-lg-12 margin-tb">
                <div class="pull-left">
                    <h2>Edit Favourite</h2>
                </div>

            </div>
        </div>
        @if (session('status'))
            <div class="alert alert-success mb-1 mt-1">
                {{ session('status') }}
            </div>
        @endif
        <form action="{{ route('favorites.update', $favorite->id) }}" method="POST" enctype="multipart/form-data">
            @csrf
            @method('PUT')

            <div class="row">
                <div class="col-xs-12 col-sm-12 col-md-12">
                    <div class="form-group">
                        <strong> Name:</strong>
                        <input type="text" name="name" value="{{ $favorite->name }}" class="form-control"
                            placeholder="name">
                        @error('name')
                            <div class="alert alert-danger mt-1 mb-1">{{ $message }}</div>
                        @enderror
                    </div>
                </div>
                <div class="col-xs-12 col-sm-12 col-md-12">
                    <div class="form-group">
                        <strong>Link:</strong>
                        <input type="text" name="link" class="form-control" placeholder="link"
                            value="{{ $favorite->link }}">
                        @error('link')
                            <div class="alert alert-danger mt-1 mb-1">{{ $message }}</div>
                        @enderror
                    </div>
                </div>
                <div class="col-xs-12 col-sm-12 col-md-12">
                    <div class="form-group">
                        <strong>Type:</strong>
                        <br/>
                        <select name="type" id="type">
                            @foreach ($types as $type)
                                <option value={{ $type->id }} {{ $favorite->type_id == $type->id ? 'selected': ''}}>{{ $type->name }}
                                </option>
                            @endforeach
                        </select>

                        @error('type')
                            <div class="alert alert-danger mt-1 mb-1">{{ $message }}</div>
                        @enderror
                    </div>
                </div>
                <div class="col-xs-12 col-sm-12 col-md-12">
                    <div class="form-group">
                        <strong>Category:</strong> <br>
                        <select name="category" id="category">
                            @foreach ($categories as $category)
                                <option value={{ $category->id }} {{ $favorite->category_id == $category->id ? 'selected': ''}}>{{ $category->name }}
                                </option>
                            @endforeach
                        </select>
                        @error('category')
                            <div class="alert alert-danger mt-1 mb-1">{{ $message }}</div>
                        @enderror
                    </div>
                </div>
                <button type="submit" class="btn btn-success ml-3">Submit</button>
            </div><br>
            <div class="pull-right">
                <a class="btn btn-primary" href="{{ route('favorites.index') }}" enctype="multipart/form-data">
                    Back</a>
            </div>
        </form>
    </div>
@endsection
e. Removing a favorite
For performing deletion of data, we have used the delete() function inside our destroy function to remove the item.
public function destroy($id)
{
    $data= Favorite::find($id);
    $data->delete();
    return redirect()->route('favorites.index')
      ->with('success', 'Favourite has been deleted successfully');
}
In Closing
Hurray! We have successfully completed project ’OLIVE’. Now, you can save all your favorites in one place.
Through this article, we went through the process of building a CRUD (Create, Read, Update, Delete) application using the Laravel framework and also touched on some of the best practices to be followed with it. There is much more we can do with the framework, like authentication, error handling, search and filtering, image upload and more.
Feel free to explore this powerful framework and build your next full stack application by leveraging Laravel. Share your thoughts and questions in the comments below.
Check out the project repository below:
GitHub - TheCoffee/coffeed-olive
Edited and Curated by
for Coffee.