Read with Claude
 Read with ChatGPT
Next.js provides us a very versatile frontend, which can be used standalone to serve most of our requirements for a website. With built-in provisions to leverage server side rendering and create APIs in the project structure itself, we can expand the capabilities of our Next.js app.
In this article, we will explore Resend, the email API for developers and integrate with our app. We will create a simple contact form, which upon submit, will send an email to our inbox with the submitted information. This integration is very useful when we want to get enquiries, waitlist, or any other kind of form information and have it directly delivered to our inbox.
Our Next.js App
I am going to create a simple Next.js app with a contact form using yarn create next-app.
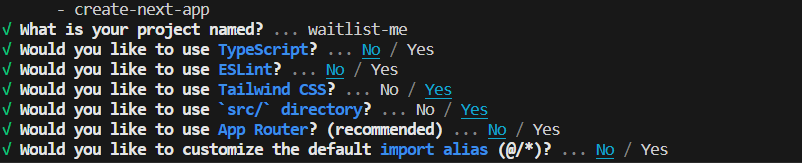
yarn create next-appFor the project configuration, I have used the following settings. I have chosen to use tailwind for styling and the src directory to keep our code organized.
Creating a contact form
I am going to keep things simple and create a contact form which prompts for name and email.
Let us update the index.js page component as follows:
import { useState } from "react";
import Head from "next/head";

export default function Home() {
    const [name, setName] = useState("");
    const [email, setEmail] = useState("");
    const [loading, setLoading] = useState(false);

    const handleSubmit = () => {
      console.log("Call send API here")
    }
    return (
        <main
            className={`flex flex-col items-center p-24 min-h-screen`}
        >
            <Head>
                <title>Contact Me | Coffeed</title>
            </Head>

            <div className="relative flex flex-col gap-4 ">
                <div className="flex flex-col place-items-center gap-4">
                    <h1 className={`m-0 text-center text-3xl`}>Contact Me</h1>
                </div>
                <form
                    className="mt-6 flex flex-col max-w-xl gap-4 z-10"
                    onSubmit={handleSubmit}
                >
                    <label htmlFor="name" className="sr-only">
                        Name
                    </label>
                    <input
                        id="name"
                        name="name"
                        type="text"
                        autoComplete="name"
                        required
                        value={name}
                        className="rounded-md bg-white/5 px-3.5 py-2.5 text-white ring-1 ring-inset focus:ring-blue-600 text-sm md:w-96"
                        placeholder="Name"
                        onChange={(e) => setName(e.target.value)}
                    />
                    <label htmlFor="email-address" className="sr-only">
                        Email address
                    </label>
                    <input
                        id="email-address"
                        name="email"
                        type="email"
                        autoComplete="email"
                        required
                        value={email}
                        className="rounded-md bg-white/5 px-3.5 py-2.5 text-white ring-1 ring-inset focus:ring-blue-600 text-sm md:w-96"
                        placeholder="Email"
                        onChange={(e) => setEmail(e.target.value)}
                    />
                    <button
                        type="submit"
                        className="flex justify-center rounded-md bg-blue-600 px-3.5 py-2.5 text-sm font-semibold text-white shadow-sm hover:bg-blue-500"
                    >
                        {loading ? (
                            <div
                                style={{
                                    borderTopColor: "transparent",
                                }}
                                className="w-6 h-6 border-4 border-white border-solid rounded-full animate-spin"
                            ></div>
                        ) : (
                            "Submit"
                        )}
                    </button>
                </form>
            </div>
        </main>
    );
}
I have used tailwind for styling and created a simple form to get the name and email from the user. We will trigger the send mail API call onSubmit of the form.
Let us set up Resend and the required APIs in Next.js to proceed further.
Getting Started with Resend
Head over to resend.com and log in to your account. You can create a new one using your email or Github.
Resend supports sending out mails to users only if you own and verify your domain on the platform. This allows you to send out mails from any email id using that domain name. For example, if I am to send a mail to users from noreply@coffeed.com, I have to add the coffeed.com domain to Resend and then add the respective domain name records to verify that I own the domain.
Add your domain
Go to Domains and click on Add Domain.
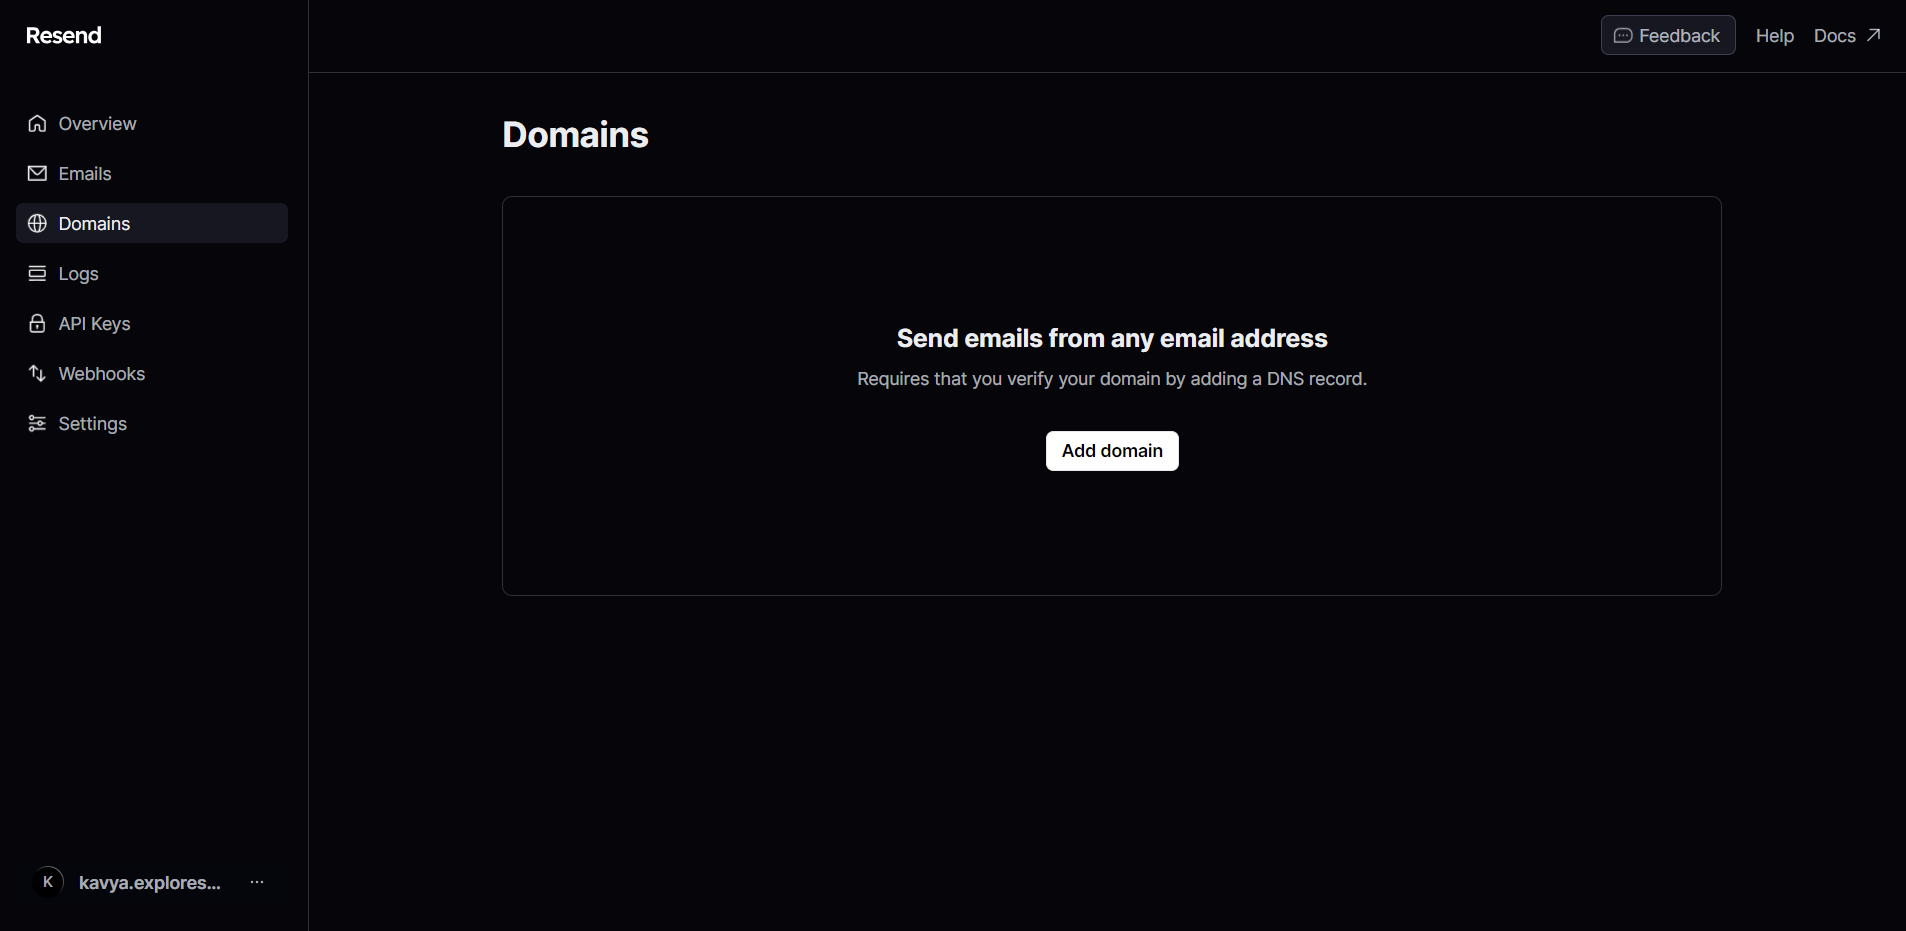
Enter your domain name and select region. The default “us-east-1” is free and works for our use-case.
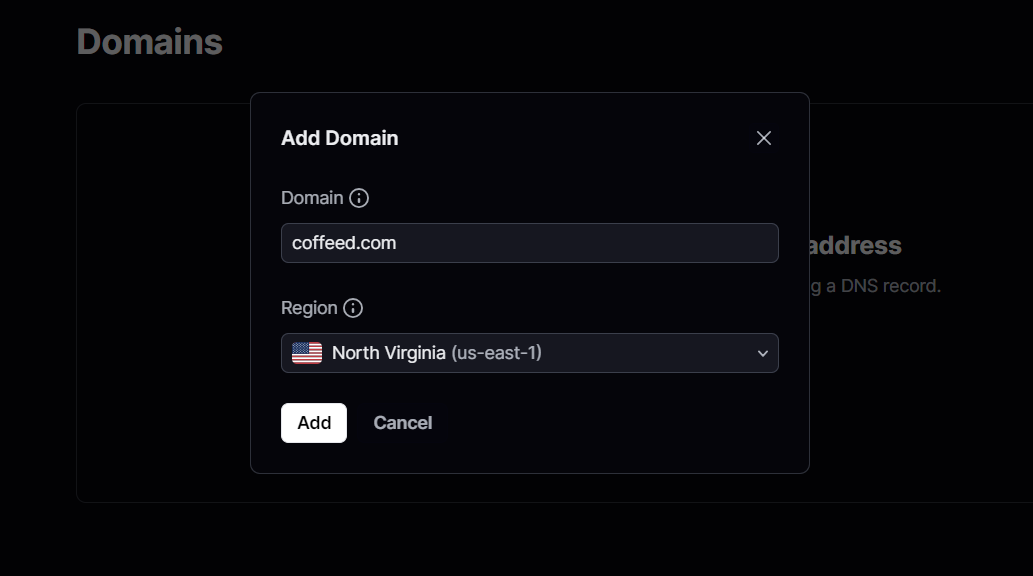
Once you add your domain, you will be shown a set of DNS records, which you should update at your domain service provider. Once you add the MX and 2 TXT records to your DNS, you can click on “Verify DNS Records” verify your domain.
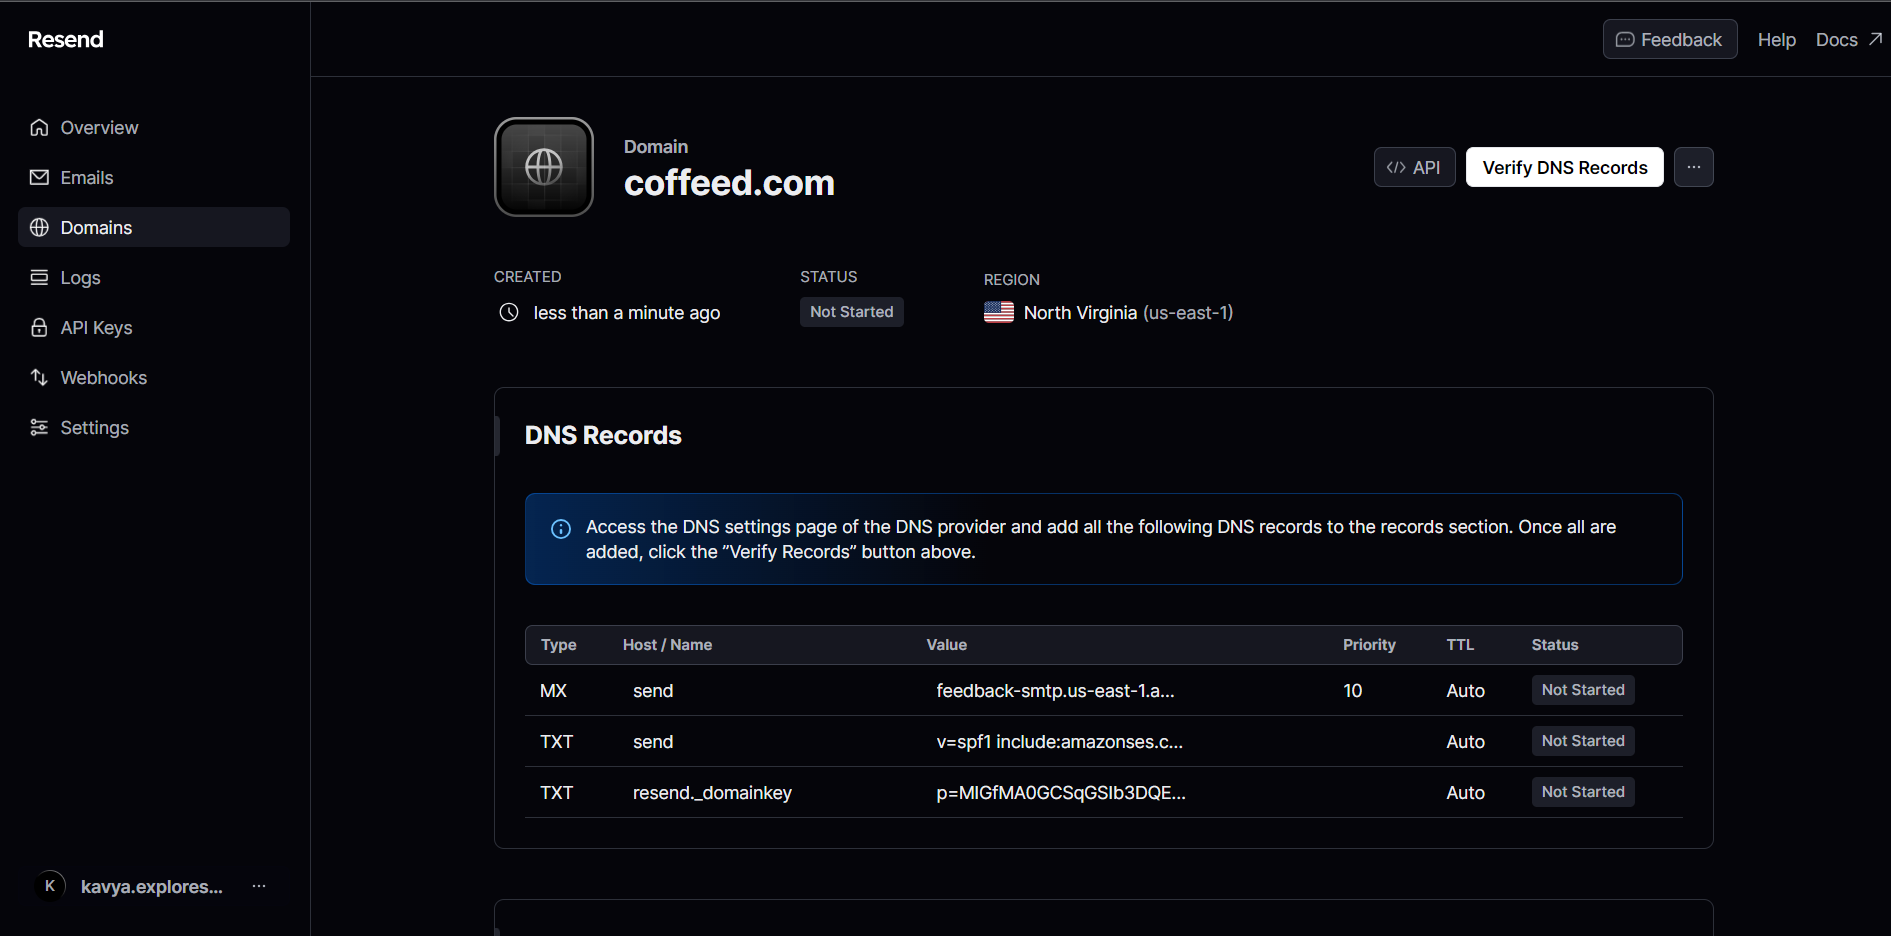
Verifying a domain is essential to ensuring the deliverability of your emails. Once you verify a domain, you will be granted permission to send emails.
Create an API key
API Keys are secret tokens used to authenticate your requests.
- Navigate to API Keys on the sidebar.
- Click Create API Key.
- Give your API Key a name.
- Select Sending access as the permission and choose the specific domain you want restrict access.
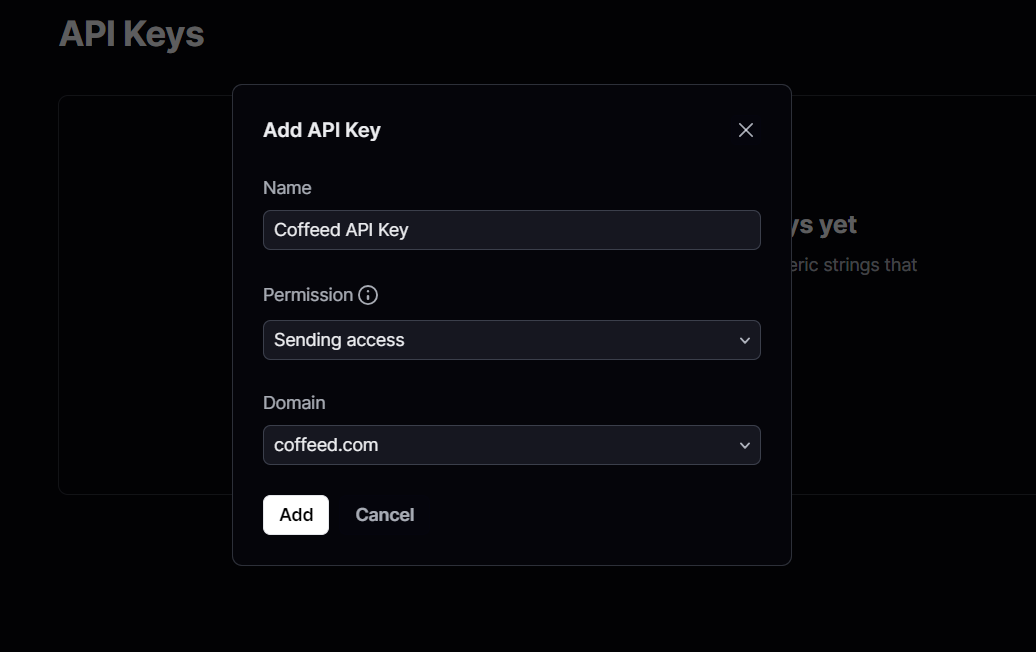
There is also the “Full access” permission but for security, it is better to use “Sending access” permission restricted to a single domain. Add this API key generated in the .env file as RESEND_API_KEY variable.
Adding Resend to your Next.js App
Now let us head back to our project and add the resend sdk library. Run the following command in the terminal:
yarn add resend1. Add an email template
Start by creating a new folder for email templates in the components folder in the src directory. Add a new email template called contact-form.jsx in src/components/email/ folder.
export const EmailTemplate = ({
name,
email
}) => (
<div>
<p>Hello Kavya,</p>
<p>
{name} has submitted the contact form on your website. Their
email is {email}!
</p>
<p>
Regards,
<br />
Coffee
</p>
</div>
);I have created a simple template to get the name and email and have used HTML to stylize the body of the email. As you can see, this is a React component, so you are free to use and customize the design by making use of any of the React components you have designed in your project.
2. Create an API to send email
Create an API file called send.js under pages/api/. We get the name and email from the request body and call the sendEmail function from the resend library with our EmailTemplate.
const resend = new Resend(process.env.RESEND_API_KEY);

const data = await resend.sendEmail({
    from: `${process.env.FROM_EMAIL}`,
    to: `${process.env.TO_EMAIL}`,
    subject: "🎉New submission to your contact form!",
    html: "",
    react: EmailTemplate({ name, email })
});
The following variables should be declared in the .env file:
RESEND_API_KEY— API key generated in the previous section in the Resend admin.FROM_EMAIL— the email address, from which the mail is to be shown to be sent from. It should be from the domain verified in the Resend admin.TO_EMAIL— the email, to which the mail should be sent to. In this case, I am sending the mail to my email id.
import { EmailTemplate } from '../../components/email/contact-form';
import { Resend } from 'resend';

const resend = new Resend(process.env.RESEND_API_KEY);

export default async (req, res) => {
  try {
    const { name, email } = JSON.parse(req.body);

    const data = await resend.sendEmail({
        from: `${process.env.FROM_EMAIL}`,
        to: `${process.env.TO_EMAIL}`,
        subject: "🎉New submission to your contact form!",
        html: "",
        react: EmailTemplate({ name, email })
    });

    res.status(200).json(data);
  } catch (error) {
    res.status(400).json(error);
  }
};
You can alternatively set the to to the submitted email id so that an email is sent directly to the user upon submission.
3. Trigger Email on Form Submit
We can create the handleSubmit function and call the api/send API to trigger the email with name and email as parameters in the body.
const [name, setName] = useState("");
const [email, setEmail] = useState("");
const [loading, setLoading] = useState(false);

const handleSubmit = async (e) => {
    setLoading(true);
    e.preventDefault();

    if (name == "" && email == "") {
        setLoading(false);
        alert("Please enter both name & email id");
        return false;
    }

    await fetch("/api/send", {
        method: "POST",
        body: JSON.stringify({ name, email }),
    })
        .then((res) => res.json())
        .then((data) => {
            setLoading(false);
            if (data && data.id) {
                alert(`Thank you for your interest ${name}! We will get back to you soon!`);
                setName("");
                setEmail("");
            } else {
                alert("Apologies! Please try again.");
            }
        })
        .catch((err) => {
            setLoading(false);
            alert("Ooops! unfortunately some error has occurred.");
        });
    return true;
};
With that, you have connected Resend to your Next.js app. Here is the final code of the index page:
import { useState } from "react";
import Head from "next/head";

export default function Home() {
    const [name, setName] = useState("");
    const [email, setEmail] = useState("");
    const [loading, setLoading] = useState(false);

    const handleSubmit = async (e) => {
        setLoading(true);
        e.preventDefault();

        if (name == "" && email == "") {
            setLoading(false);
            alert("Please enter both name & email id");
            return false;
        }

        await fetch("/api/send", {
            method: "POST",
            body: JSON.stringify({ name, email }),
        })
            .then((res) => res.json())
            .then((data) => {
                setLoading(false);
                if (data && data.id) {
                    alert(`Thank you for your interest ${name}! We will get back to you soon!`);
                    setName("");
                    setEmail("");
                } else {
                    alert("Apologies! Please try again.");
                }
            })
            .catch((err) => {
                setLoading(false);
                alert("Ooops! unfortunately some error has occurred.");
            });
        return true;
    };
    return (
        <main
            className={`flex flex-col items-center p-24 min-h-screen`}
        >
            <Head>
                <title>Contact Me | Coffeed</title>
            </Head>

            <div className="relative flex flex-col gap-4 ">
                <div className="flex flex-col place-items-center gap-4">
                    <h1 className={`m-0 text-center text-3xl`}>Contact Me</h1>
                </div>
                <form
                    className="mt-6 flex flex-col max-w-xl gap-4 z-10"
                    onSubmit={handleSubmit}
                >
                    <label htmlFor="name" className="sr-only">
                        Name
                    </label>
                    <input
                        id="name"
                        name="name"
                        type="text"
                        autoComplete="name"
                        required
                        value={name}
                        className="rounded-md bg-white/5 px-3.5 py-2.5 text-white ring-1 ring-inset focus:ring-blue-600 text-sm md:w-96"
                        placeholder="Name"
                        onChange={(e) => setName(e.target.value)}
                    />
                    <label htmlFor="email-address" className="sr-only">
                        Email address
                    </label>
                    <input
                        id="email-address"
                        name="email"
                        type="email"
                        autoComplete="email"
                        required
                        value={email}
                        className="rounded-md bg-white/5 px-3.5 py-2.5 text-white ring-1 ring-inset focus:ring-blue-600 text-sm md:w-96"
                        placeholder="Email"
                        onChange={(e) => setEmail(e.target.value)}
                    />
                    <button
                        type="submit"
                        className="flex justify-center rounded-md bg-blue-600 px-3.5 py-2.5 text-sm font-semibold text-white shadow-sm hover:bg-blue-500"
                    >
                        {loading ? (
                            <div
                                style={{
                                    borderTopColor: "transparent",
                                }}
                                className="w-4 h-4 border-2 border-white border-solid rounded-full animate-spin"
                            ></div>
                        ) : (
                            "Submit"
                        )}
                    </button>
                </form>
            </div>
        </main>
    );
}
On submitting the form, the mail will be sent to the TO_EMAIL set in the .env file.
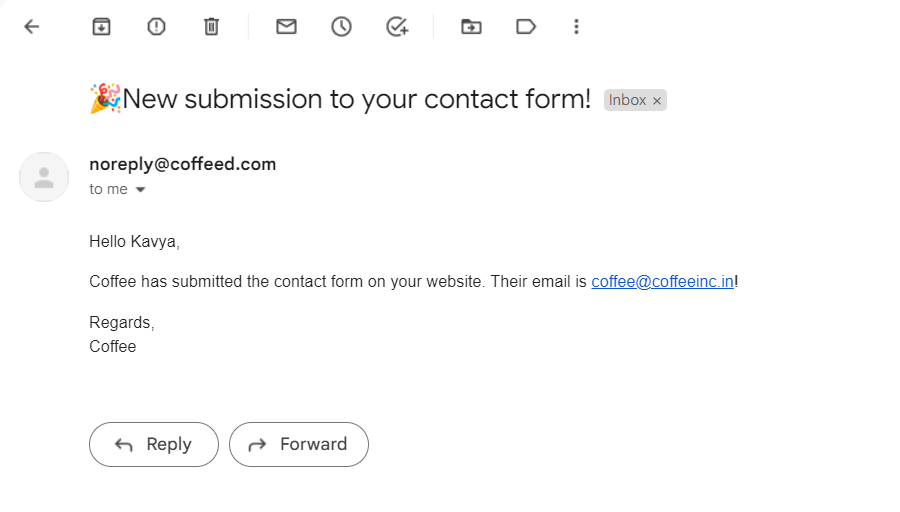
You can further make use of the email API and integrate it for other use-cases to get notified directly to your inbox.
This page is part of the Next.js playbook, which is in the works at Coffee. Drop a mail to coffee@coffeeinc.in if you want to get on the waitlist.